
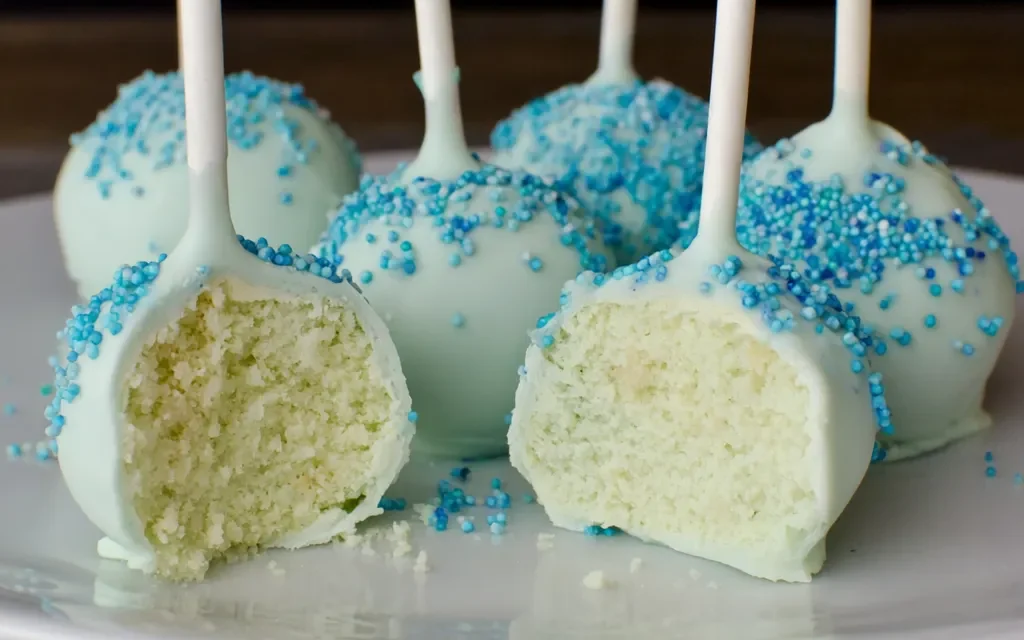
I still remember the first time I sank my teeth into one of these irresistible Glacier Blue Velvet Cake Pops. It was during my cousin’s baby shower, and the moment I popped that vibrant blue confection into my mouth, I was utterly enchanted. The rich, velvety texture mingled with the subtle sweetness, creating an experience that was both indulgent and refreshing. From that day on, I knew these Glacier Blue Velvet Cake Pops would become a staple in my repertoire – a treat I could whip up for any occasion to delight my loved ones.
Why This Glacier Blue Velvet Cake Pops Recipe Will Become Your Go-To
The Secret Behind Perfect Glacier Blue Velvet Cake Pops
What sets this Glacier Blue Velvet Cake Pops recipe apart is the meticulous attention to detail and the thoughtful blend of ingredients. The key lies in the perfect balance between the deep, chocolatey notes of the cocoa powder and the tangy richness of the cream cheese frosting. And the vibrant blue hue? That’s all thanks to the carefully measured addition of food coloring, which creates a visually stunning and eye-catching result.
Essential Ingredients You’ll Need
To craft these Glacier Blue Velvet Cake Pops, you’ll need a few essential ingredients:
- 2 cups all-purpose flour: The foundation of the cake, providing structure and a tender crumb.
- 1 1/2 cups granulated sugar: Sweetening the cake and balancing the cocoa powder’s bitterness.
- 1/2 cup unsweetened cocoa powder: Delivering the rich, chocolatey flavor that defines a classic velvet cake.
- 1 teaspoon baking soda: Helping the cake rise and achieve a light, airy texture.
- 1/2 teaspoon salt: Enhancing the other flavors and providing balance.
- 1 cup buttermilk: Lending moisture and a subtle tanginess to the cake.
- 1/2 cup vegetable oil: Keeping the cake moist and tender.
- 2 large eggs: Binding the ingredients together and adding structure.
- 1 teaspoon vanilla extract: Infusing the cake with a warm, aromatic note.
- 1/2 cup cream cheese, softened: The key to the luscious, creamy frosting.
- 1/4 cup unsalted butter, softened: Complementing the cream cheese for a smooth, velvety texture.
- 4 cups powdered sugar: Sweetening and thickening the frosting to the perfect consistency.
- 2 tablespoons heavy cream: Helping to thin out the frosting and create a silky, spreadable texture.
- 1-2 tablespoons blue food coloring: Transforming the frosting into a stunning glacier blue hue.
Step-by-Step Glacier Blue Velvet Cake Pops Instructions
Preparing Your Glacier Blue Velvet Cake Pops
With a prep time of just 15 minutes and a cook time of 30 minutes, you can have these delightful Glacier Blue Velvet Cake Pops ready to serve in just 45 minutes. Gather your ingredients and equipment, including a baking sheet, a large mixing bowl, a hand mixer, and a small cookie scoop or melon baller.
1- Preheat your oven to 350°F (175°C) and line a baking sheet with parchment paper. In a large mixing bowl, whisk together the 2 cups of all-purpose flour, 1 1/2 cups of granulated sugar, 1/2 cup of unsweetened cocoa powder, 1 teaspoon of baking soda, and 1/2 teaspoon of salt until well combined.
2- In a separate bowl, whisk together the 1 cup of buttermilk, 1/2 cup of vegetable oil, 2 large eggs, and 1 teaspoon of vanilla extract until the mixture is smooth and well-incorporated.
3- Gradually pour the wet ingredients into the dry ingredients, mixing on medium speed with a hand mixer until the batter is smooth and free of lumps, about 2-3 minutes.
4- Scoop the batter onto the prepared baking sheet, using a small cookie scoop or melon baller to create uniform, bite-sized mounds. Bake for 12-15 minutes, or until a toothpick inserted into the center of a cake pop comes out clean.
5- Remove the cake pops from the oven and let them cool completely on the baking sheet, about 20-25 minutes.
6- Once the cake pops are cooled, use your hands to gently crumble them into a large mixing bowl, creating a fine, uniform crumb.
Pro Tips for Success
1- Be sure to use room-temperature ingredients for the best results. This will ensure the batter comes together smoothly and the frosting whips up to a creamy, spreadable consistency.
2- Sifting the dry ingredients, including the cocoa powder, will help prevent any lumps or pockets in the batter.
3- Overmixing the batter can lead to a tough, dense texture, so be mindful to mix just until the ingredients are well combined.
4- Invest in a small cookie scoop or melon baller to ensure your cake pops are uniform in size and bake evenly.
5- Chilling the cake pop mixture for 30 minutes before shaping can make the process easier and help the pops hold their shape better.
Serving and Storing Your Glacier Blue Velvet Cake Pops
Perfect Pairings for Glacier Blue Velvet Cake Pops
These Glacier Blue Velvet Cake Pops are the perfect bite-sized treat to serve at any gathering, from baby showers and bridal luncheons to birthday parties and holiday celebrations. With 24 cake pops per batch, you’ll have plenty to share. For a delightful pairing, serve them alongside a cup of freshly brewed coffee or a glass of chilled champagne for a touch of elegance. They also make a wonderful addition to a dessert table, complementing other sweet treats like mini cupcakes or truffles.
Storage and Make-Ahead Tips
If you can’t resist the temptation to enjoy these Glacier Blue Velvet Cake Pops right away, you’re in luck – they’ll keep for up to 5 days when stored in an airtight container in the refrigerator. For longer-term storage, the cake pops can be frozen for up to 2 months. Simply place them in a single layer on a baking sheet and freeze until firm, then transfer them to an airtight container or resealable plastic bag.
When you’re ready to serve, simply thaw the cake pops in the refrigerator overnight. You can also reheat them in the microwave for 10-15 seconds to soften the frosting before serving. With these easy storage and make-ahead tips, you can enjoy the delectable taste of Glacier Blue Velvet Cake Pops any time the craving strikes.
Variations and Dietary Adaptations for Glacier Blue Velvet Cake Pops
Creative Glacier Blue Velvet Cake Pops Variations
While the classic Glacier Blue Velvet Cake Pops are an absolute delight, you can get creative with a few fun variations:
- Swap the blue food coloring for red or green for a festive twist perfect for the holidays.
- Add a sprinkle of crushed candy canes or chopped nuts to the frosting for a delightful textural contrast.
- Dip the cake pops in melted white chocolate or drizzle them with a contrasting color for a stunning visual effect.
- Experiment with different flavors by infusing the frosting with extracts like peppermint, almond, or orange.
Making Glacier Blue Velvet Cake Pops Diet-Friendly
For those with dietary restrictions, you can easily adapt this Glacier Blue Velvet Cake Pops recipe to fit your needs:
- Gluten-free: Substitute the all-purpose flour with a 1:1 gluten-free flour blend.
- Vegan: Replace the eggs with 2 tablespoons of ground flax or chia seeds mixed with 6 tablespoons of water. Use dairy-free cream cheese and vegan butter for the frosting.
- Low-carb: Swap the granulated sugar for a keto-friendly sweetener like erythritol or monk fruit. Use a sugar-free powdered sugar alternative for the frosting.
With these simple swaps, you can enjoy the delectable taste of Glacier Blue Velvet Cake Pops while catering to your dietary needs.
Frequently Asked Questions
Q: Can I substitute the buttermilk with regular milk?
A: While you can use regular milk, the buttermilk is essential for creating the signature tangy, moist texture of a velvet cake. If you don’t have buttermilk on hand, you can make a simple substitute by mixing 1 cup of regular milk with 1 tablespoon of lemon juice or white vinegar.
Q: How long do I need to bake the cake pops?
A: The cake pops should bake for 12-15 minutes in a 350°F (175°C) oven, or until a toothpick inserted into the center comes out clean. Keep a close eye on them towards the end of the baking time to ensure they don’t overbake and become dry.
Q: Can I make the cake pops in advance?
A: Absolutely! The crumbled cake can be stored in an airtight container in the refrigerator for up to 3 days before assembling the cake pops. The frosting can also be made ahead of time and refrigerated for up to 5 days. When ready to assemble, simply scoop the frosting onto the cake crumbs and roll into balls.
Q: How many cake pops does this recipe make?
A: This Glacier Blue Velvet Cake Pops recipe yields 24 servings. The bite-sized nature of the cake pops makes them perfect for sharing with a crowd or enjoying as a small, indulgent treat.
Q: What should I do if the cake pops crumble when I try to assemble them?
A: If the cake pops are too dry and crumbly to hold their shape, try adding a tablespoon or two of heavy cream or buttermilk to the mixture. This will help bind the crumbs together and make them easier to roll into smooth, cohesive balls.

Glacier Blue Velvet Cake Pops
- Total Time: 45
- Yield: 24 cake pops
Description
Indulge in the velvety goodness of these Glacier Blue Velvet Cake Pops – a quick and easy homemade treat that’s perfect for any occasion. With a vibrant blue hue and a moist, tender texture, these bite-sized sweets are sure to delight.
Ingredients
– 2 cups all-purpose flour
– 1 1/2 cups granulated sugar
– 1/2 cup unsweetened cocoa powder
– 1 teaspoon baking soda
– 1/2 teaspoon salt
– 1 cup buttermilk
– 1/2 cup vegetable oil
– 2 large eggs
– 1 teaspoon vanilla extract
– 1/2 cup cream cheese, softened
– 1/4 cup unsalted butter, softened
– 4 cups powdered sugar
– 2 tablespoons heavy cream
– 1-2 tablespoons blue food coloring
Instructions
1. Preheat the oven to 350°F. Grease and flour a 9×13-inch baking pan.
2. In a large bowl, whisk together the flour, sugar, cocoa powder, baking soda, and salt.
3. In a separate bowl, combine the buttermilk, oil, eggs, and vanilla. Add the wet ingredients to the dry ingredients and mix until just combined.
4. Pour the batter into the prepared baking pan and bake for 25-30 minutes, or until a toothpick inserted into the center comes out clean.
5. Allow the cake to cool completely, then crumble it into a large bowl.
6. In a separate bowl, beat the cream cheese and butter until smooth. Gradually add the powdered sugar and heavy cream, mixing until well combined.
7. Add the cream cheese mixture to the crumbled cake and mix until a dough-like consistency forms. If needed, add more cream or powdered sugar to achieve the desired texture.
8. Scoop the mixture by the tablespoonful and roll into balls. Place the cake pops on a parchment-lined baking sheet.
9. In a small bowl, mix together the blue food coloring and 2 tablespoons of the cream cheese mixture until well combined.
10. Dip the cake pops into the blue coating, allowing any excess to drip off. Place the coated pops back on the baking sheet.
11. Refrigerate the cake pops for at least 30 minutes before serving.
Notes
For a richer flavor, substitute dark cocoa powder for the regular cocoa powder. You can also experiment with different food coloring shades to create unique color variations.
- Prep Time: 15
- Cook Time: 30
- Category: Cakes & No-Bake Sweets
- Method: Baking
- Cuisine: American
Conclusion
These Glacier Blue Velvet Cake Pops are truly a decadent delight that will have your guests swooning. With their vibrant blue hue, velvety texture, and rich, chocolatey flavor, they’re sure to become the star of any occasion. Whether you’re hosting a special event or simply treating yourself, this recipe is a must-try. So what are you waiting for? Gather your ingredients, put on your baking apron, and get ready to create a batch of these irresistible Glacier Blue Velvet Cake Pops that will have everyone coming back for more. Don’t forget to share your creations and tag me on social media – I can’t wait to see your stunning results!


