
Growing up, I can still remember the anticipation I felt when my grandmother would bring out her famous jars of pickled cherries. The deep ruby hue and tantalizing aroma would instantly transport me to those cozy summer afternoons spent on her porch, savoring each sweet-and-sour bite. It wasn’t just a snack – it was a cherished family tradition that I’ve carried with me ever since.
Now, as an experienced home cook, I’m thrilled to share my own perfected Pickled Cherries recipe that will have your taste buds dancing with joy. These vibrant, flavorful cherries are the ultimate condiment, topping, or standalone treat that you’ll find yourself craving again and again.
Why This Pickled Cherries Recipe Will Become Your Go-To
The Secret Behind Perfect Pickled Cherries
There’s something truly special about homemade pickled cherries. While you can certainly find them at specialty stores, nothing quite compares to the depth of flavor and texture you get when you make them yourself. The secret lies in the perfect balance of sweet, tart, and spice that comes together in this recipe.
By using just the right amount of white vinegar, granulated sugar, cinnamon, and cloves, we’re able to create a brine that transforms fresh, juicy cherries into a delightful, shelf-stable treat. The slow simmering process allows the flavors to meld together seamlessly, resulting in a pickled cherry that’s bursting with character. And with a total prep and cook time of just 30 minutes, you can enjoy this gourmet-level condiment without spending hours in the kitchen.
Essential Ingredients You’ll Need
To make these Pickled Cherries, you’ll need:
- 2 pounds fresh cherries, pitted – The star of the show! Look for plump, juicy cherries that are at the peak of ripeness for maximum flavor.
- 1 cup white vinegar – This provides the perfect balance of acidity to pickle the cherries and preserve their texture.
- 1 cup granulated sugar – Offsetting the vinegar, the sugar creates that addictive sweet-and-sour taste we all love.
- 2 cinnamon sticks – Warming cinnamon lends its signature aroma and subtle spice notes to the brine.
- 6 whole cloves – A touch of earthy, aromatic clove complements the other flavors beautifully.
Together, these simple ingredients transform into a flavor-packed pickle that you’ll want to have on hand at all times.
Step-by-Step Pickled Cherries Instructions
Preparing Your Pickled Cherries
With a total time of just 30 minutes – 15 minutes of prep and 15 minutes of cooking – this Pickled Cherries recipe comes together in a flash. All you’ll need is a medium saucepan, a sharp knife, and a little bit of patience as the flavors meld together.
1- First, pit the 2 pounds of fresh cherries. This is the most time-consuming part of the process, but it’s worth it to get that perfect texture. I find that a cherry pitter makes the job quick and easy.
2- In the saucepan, combine the pitted cherries, 1 cup of white vinegar, 1 cup of granulated sugar, 2 cinnamon sticks, and 6 whole cloves. Bring the mixture to a simmer over medium heat, stirring occasionally to dissolve the sugar.
3- Once simmering, reduce the heat to low and let the cherries pickle for 15 minutes, until they’ve softened slightly and the brine has thickened up.
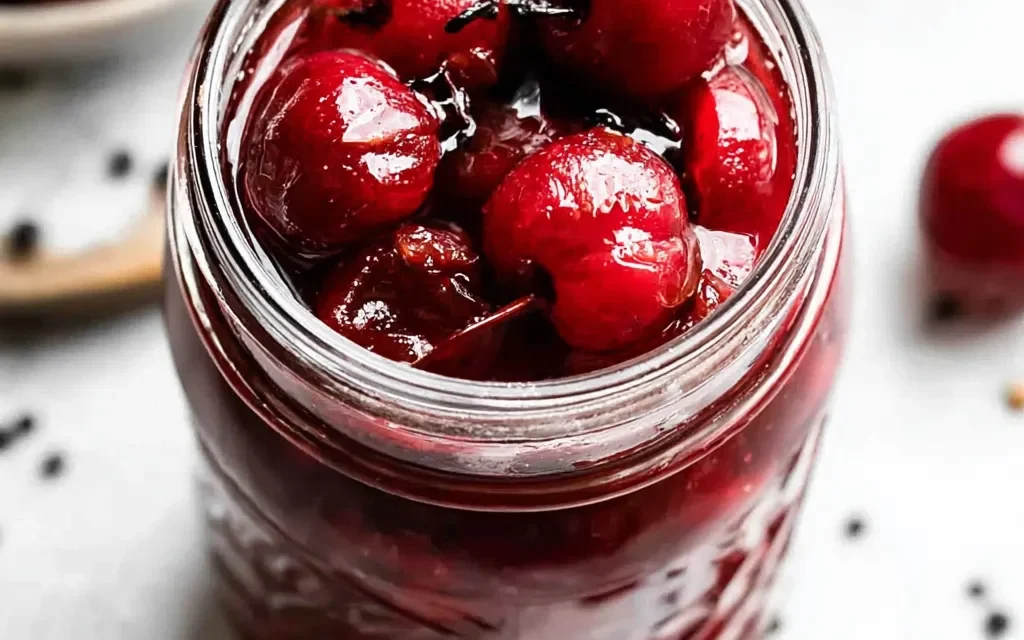
4- Remove the saucepan from the heat and let the Pickled Cherries cool completely, about 30 minutes. You’ll know they’re ready when the cherries have a deeper, more jewel-toned color and the brine has a syrupy consistency.
5- Using a slotted spoon, transfer the pickled cherries to a clean, airtight jar or container.
6- Pour the flavorful pickling brine over the cherries, making sure they’re fully submerged. Seal the container and refrigerate until ready to enjoy.
Pro Tips for Success
- Choose the freshest, ripest cherries you can find for the most vibrant flavor. Look for cherries with deep red color and a firm, glossy texture.
- Pitting the cherries can be time-consuming, but the resulting texture is well worth it. If you don’t have a cherry pitter, you can use a sharp paring knife or a paperclip to easily pop out the pits.
- Be patient during the simmering process – the longer the cherries pickle, the more the flavors will develop and meld together. Resist the urge to rush this step.
- For the best texture, let the Pickled Cherries cool completely before transferring them to the jar. This allows the brine to thicken up and the cherries to firm up.
Serving and Storing Your Pickled Cherries
Perfect Pairings for Pickled Cherries
These Pickled Cherries are the ultimate versatile condiment, topping, or snack. With their sweet-and-sour flavor profile, they pair beautifully with a variety of dishes. Try them atop roasted pork tenderloin, stirred into your morning yogurt, or even as a unique garnish for craft cocktails.
For a simple but elegant appetizer, serve the Pickled Cherries alongside a cheese board with crackers, nuts, and a drizzle of honey. They also make a lovely accompaniment to grilled meats, roasted vegetables, or hearty grain salads. And of course, they’re a delightful standalone snack that’s perfect for sharing with family and friends.
Since this recipe yields 12 servings, you’ll have plenty to enjoy on their own or incorporate into all sorts of creative culinary creations.
Storage and Make-Ahead Tips
The best part about this Pickled Cherries recipe is that it keeps beautifully in the refrigerator. Once the cherries have fully cooled, transfer them to an airtight container or jar and pour the brine over top, making sure the cherries are completely submerged.
Store the Pickled Cherries in the fridge for up to 2 months. The flavors will continue to develop over time, so don’t be afraid to make a big batch and enjoy them for weeks to come.
If you’d like to enjoy your Pickled Cherries for even longer, they also freeze exceptionally well. Simply transfer the cherries and brine to a freezer-safe container or bag, and they’ll keep for up to 6 months. Thaw in the refrigerator overnight before serving.
Variations and Dietary Adaptations for Pickled Cherries
Creative Pickled Cherries Variations
While this classic Pickled Cherries recipe is hard to beat, there are plenty of ways to put your own spin on it:
- For a more savory twist, try adding a pinch of crushed red pepper flakes or a teaspoon of whole black peppercorns to the brine.
- Swap out the cinnamon sticks for star anise or a vanilla bean for a unique flavor profile.
- Make them extra festive by using a mix of red and golden cherries for a beautiful color contrast.
- Jazz them up with a splash of kirsch or brandy for a boozy variation.
No matter how you customize them, these Pickled Cherries are sure to delight.
Making Pickled Cherries Diet-Friendly
Looking to make your Pickled Cherries a bit more diet-conscious? It’s easy to adapt this recipe to suit a variety of dietary needs:
- For a low-carb or keto-friendly version, simply swap the granulated sugar for an equal amount of your favorite granulated sugar substitute.
- To make them vegan, use a neutral-flavored plant-based vinegar like apple cider or rice vinegar in place of the white vinegar.
- Gluten-free eaters can enjoy these Pickled Cherries as-is, since there are no wheat-based ingredients.
No matter which dietary adjustments you make, you’ll still end up with a flavor-packed condiment that everyone can enjoy.
Frequently Asked Questions
Q: Can I use frozen cherries instead of fresh?
A: While fresh cherries are ideal for this recipe, you can certainly use frozen cherries in a pinch. Just be sure to thaw them completely and pat them dry before adding them to the brine.
Q: How long do Pickled Cherries take to make?
A: With a total time of just 30 minutes – 15 minutes of prep and 15 minutes of cooking – this Pickled Cherries recipe comes together quickly.
Q: How long do Pickled Cherries last in the fridge?
A: Properly stored in an airtight container, these Pickled Cherries will keep for up to 2 months in the refrigerator. They also freeze beautifully for up to 6 months.
Q: How many servings does this recipe make?
A: This Pickled Cherries recipe yields 12 servings, so it’s perfect for sharing with family and friends or enjoying as a flavorful condiment over time.
Q: What if my Pickled Cherries turn out too sweet or too tart?
A: If the flavor seems imbalanced, you can easily adjust by adding a bit more vinegar for tartness or a touch more sugar for sweetness. Just be sure to taste and adjust in small increments until you achieve the perfect flavor profile.

Pickled Cherries
- Total Time: 30
- Yield: 12 servings
Description
These quick and easy Pickled Cherries are a sweet-tart preserved treat that add a gourmet touch to everything from charcuterie boards to cocktails. Enjoy them year-round as a versatile condiment or appetizer.
Ingredients
– 2 pounds fresh cherries, pitted
– 1 cup white vinegar
– 1 cup granulated sugar
– 2 cinnamon sticks
– 6 whole cloves
Instructions
1. In a medium saucepan, combine the vinegar and sugar. Bring to a boil, stirring occasionally, until the sugar has fully dissolved.
2. Add the pitted cherries, cinnamon sticks, and cloves. Reduce heat and simmer for 5 minutes.
3. Carefully transfer the cherries and pickling liquid to a clean, sterilized jar. Seal the jar and let cool completely at room temperature.
4. Refrigerate the Pickled Cherries for at least 4 hours, or up to 2 weeks, before serving.
Notes
For best texture, use fresh, firm cherries. The Pickled Cherries can be enjoyed on their own as an appetizer, or used as a topping for charcuterie boards, cheese plates, cocktails, and more.
- Prep Time: 15
- Cook Time: 15
- Category: Dips & Spreads
- Method: Stovetop
- Cuisine: American
Conclusion
Pickled Cherries are a true culinary delight – a vibrant, flavor-packed condiment that will elevate any dish. With this easy, 30-minute recipe, you can enjoy the sweet, tart, and spiced notes of homemade pickled cherries anytime. Whether you serve them as a standalone snack, incorporate them into your favorite recipes, or gift them to loved ones, these cherries are sure to become a cherished staple in your kitchen.
So what are you waiting for? Grab those fresh, juicy cherries and let’s get pickling! I can’t wait to hear how your Pickled Cherries turn out. Be sure to leave a comment and share your creations – I love seeing how you make this recipe your own.

