
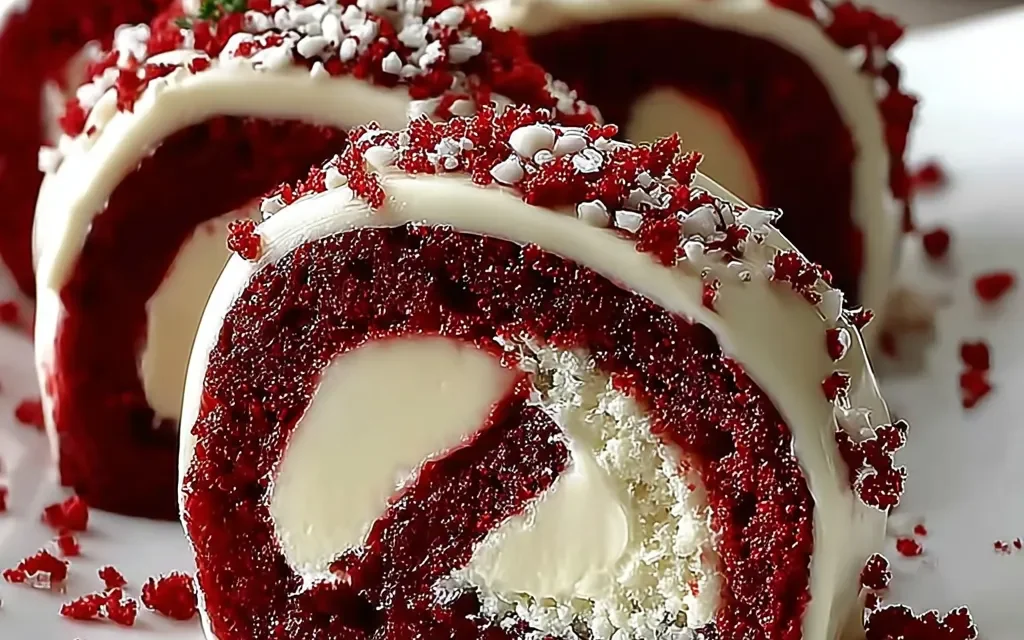
I remember the first time I tried Red Velvet Cheesecake Sushi Rolls – it was at a small bakery downtown, and the moment I took that first bite, I was hooked. The rich, creamy cheesecake filling, the soft, velvety red cake, and the crunch of the nori wrap… it was an explosion of flavors and textures that I just couldn’t get enough of. From that day on, I knew this unique dessert would become a regular in my baking repertoire.
Why This Red Velvet Cheesecake Sushi Rolls Recipe Will Become Your Go-To
The Secret Behind Perfect Red Velvet Cheesecake Sushi Rolls
What makes this recipe so special is the perfect balance of flavors and textures. The creamy cheesecake filling, made with softened cream cheese, sugar, and vanilla, is a perfect complement to the moist, chocolatey red velvet cake. And by wrapping it all up in a sheet of nori, you get that satisfying crunch that takes this dessert to the next level. Plus, the vibrant red color of the cake is not only visually stunning, but it also adds a richness that’s hard to beat.
Essential Ingredients You’ll Need
- 8 ounces cream cheese, softened: This is the base of the creamy cheesecake filling, providing a luxurious texture and flavor.
- 1/2 cup granulated sugar: This sweetens the filling and helps balance the tangy cream cheese.
- 1 egg: This helps bind the filling and gives it a silky smoothness.
- 1 teaspoon vanilla extract: Adds a warm, aromatic note to the filling.
- 1 cup all-purpose flour: The foundation of the moist, tender red velvet cake.
- 1/4 cup unsweetened cocoa powder: Gives the cake its signature deep, chocolatey flavor.
- 1 teaspoon baking soda: Helps the cake rise and achieve a light, fluffy texture.
- 1/4 teaspoon salt: Enhances all the other flavors.
- 1 cup buttermilk: Keeps the cake moist and tender.
- 2 tablespoons red food coloring: Responsible for the iconic red velvet hue.
- 1 sheet sushi nori (seaweed wrap): Adds a delightful crunch and savory element to the dessert.
Step-by-Step Red Velvet Cheesecake Sushi Rolls Instructions
Preparing Your Red Velvet Cheesecake Sushi Rolls
With a total preparation and cooking time of just 45 minutes, this Red Velvet Cheesecake Sushi Rolls recipe is quick and easy to make. You’ll need a mixing bowl, a baking sheet, and a sharp knife to complete this delicious dessert.
1- Start by preheating your oven to 350°F and lining a baking sheet with parchment paper. In a medium-sized bowl, beat the softened cream cheese with the granulated sugar until smooth and creamy.
2- Next, add the egg and vanilla extract to the cream cheese mixture and beat until well combined. Set this cheesecake filling aside while you prepare the red velvet cake batter.
3- In a separate bowl, whisk together the all-purpose flour, cocoa powder, baking soda, and salt. Gradually add the buttermilk and red food coloring, mixing just until the batter is smooth and uniform in color.
4- Spread the red velvet cake batter evenly onto the prepared baking sheet, making sure to reach all the corners. Bake for 20-25 minutes, until a toothpick inserted into the center comes out clean.
5- Once the cake has cooled completely, spread the cheesecake filling evenly over the surface. Carefully roll up the cake, using the nori sheet to help you achieve a tight, uniform roll.
6- Slice the red velvet cheesecake sushi rolls into 1-inch pieces and arrange them on a serving platter. Enjoy this decadent treat immediately or refrigerate until ready to serve.
Pro Tips for Success
- Make sure your cream cheese is truly softened to room temperature before beginning – this will ensure a smooth, creamy filling.
- Don’t overmix the cake batter, as this can result in a tough, rubbery texture. Gently fold the wet and dry ingredients together until just combined.
- Be patient when rolling the cake – take your time and use the nori sheet as a guide to get a tight, uniform roll.
- Chill the rolled cake in the refrigerator for at least 30 minutes before slicing to help it hold its shape.
Serving and Storing Your Red Velvet Cheesecake Sushi Rolls
Perfect Pairings for Red Velvet Cheesecake Sushi Rolls
These Red Velvet Cheesecake Sushi Rolls are a true showstopper, making them perfect for special occasions, holiday gatherings, or just a indulgent treat. Serve them alongside a cup of hot coffee or tea for a cozy and satisfying dessert. They also pair beautifully with a glass of chilled white wine or champagne for a more sophisticated pairing. And don’t forget the fresh berries – a sprinkle of raspberries, blackberries, or even pomegranate seeds can add a lovely pop of color and freshness to this rich dessert.
Storage and Make-Ahead Tips
These Red Velvet Cheesecake Sushi Rolls can be stored in the refrigerator for up to 5 days. Simply place them in an airtight container or wrap them tightly in plastic wrap. When ready to serve, let them come to room temperature for about 15 minutes before slicing and enjoying.
For make-ahead convenience, you can actually prepare the entire recipe in advance. Bake the red velvet cake, assemble the rolls, and then freeze them for up to 2 months. When ready to serve, thaw the rolls in the refrigerator overnight, then slice and enjoy.
Variations and Dietary Adaptations for Red Velvet Cheesecake Sushi Rolls
Creative Red Velvet Cheesecake Sushi Rolls Variations
- Swap out the cream cheese filling for a mascarpone or ricotta-based filling for a slightly different texture.
- Add a sprinkle of chopped nuts, such as pecans or walnuts, for a delightful crunch.
- Try using a different colored cake, like green or blue velvet, for a fun twist on the classic.
- Drizzle the sliced rolls with a white chocolate or caramel sauce for an extra decadent touch.
Making Red Velvet Cheesecake Sushi Rolls Diet-Friendly
To make this recipe more diet-friendly, you can try the following substitutions:
- For a gluten-free version, use a 1-to-1 gluten-free flour blend in place of the all-purpose flour.
- Swap the granulated sugar for a calorie-free sweetener, such as erythritol or monk fruit, to reduce the overall sugar content.
- Use a dairy-free cream cheese and unsweetened almond or coconut milk in the filling to make it vegan.
- Omit the red food coloring for a more natural, less processed look and flavor.
Frequently Asked Questions
Q: Can I use a different type of cream cheese besides the traditional full-fat variety?
A: While you can certainly experiment with low-fat or flavored cream cheese, the original recipe works best with regular, full-fat cream cheese for the perfect creamy texture and rich flavor.
Q: How long do I need to bake the red velvet cake?
A: The cake should bake for 20-25 minutes, until a toothpick inserted into the center comes out clean. Be sure to keep an eye on it towards the end to avoid overbaking.
Q: Can I make the rolls ahead of time and store them in the freezer?
A: Yes, you can! Assemble the rolls, wrap them tightly in plastic wrap or foil, and freeze for up to 2 months. Thaw in the refrigerator overnight before slicing and serving.
Q: How many servings does this recipe make?
A: This recipe yields 12 servings of Red Velvet Cheesecake Sushi Rolls.
Q: What’s the best way to slice the rolled cake without it falling apart?
A: For clean, neat slices, chill the rolled cake in the refrigerator for at least 30 minutes before slicing. Use a sharp knife and apply gentle pressure to cut through the cake, rather than sawing back and forth.

Red Velvet Cheesecake Sushi Rolls
- Total Time: 45
- Yield: 12 servings
Description
Indulge in the decadent fusion of red velvet cake, creamy cheesecake, and the unique sushi roll format with these Red Velvet Cheesecake Sushi Rolls. A truly unforgettable dessert that will delight your taste buds.
Ingredients
– 8 ounces cream cheese, softened
– 1/2 cup granulated sugar
– 1 egg
– 1 teaspoon vanilla extract
– 1 cup all-purpose flour
– 1/4 cup unsweetened cocoa powder
– 1 teaspoon baking soda
– 1/4 teaspoon salt
– 1 cup buttermilk
– 2 tablespoons red food coloring
– 1 sheet sushi nori (seaweed wrap)
Instructions
1. Preheat the oven to 350°F. Grease an 8×8-inch baking pan.
2. In a medium bowl, beat the cream cheese and sugar until smooth and creamy. Beat in the egg and vanilla until well combined.
3. In a separate bowl, whisk together the flour, cocoa powder, baking soda, and salt.
4. In a third bowl, mix the buttermilk and red food coloring.
5. Add the dry ingredients to the wet ingredients in three batches, mixing just until combined after each addition.
6. Pour the batter into the prepared baking pan and bake for 25-30 minutes, until a toothpick inserted in the center comes out clean.
7. Allow the red velvet cake to cool completely, then cut it into thin strips, about 1-inch wide.
8. Spread a layer of the cream cheese mixture onto the sushi nori sheet, leaving a 1-inch border on one side.
9. Arrange the red velvet cake strips in a single layer on top of the cream cheese.
10. Carefully roll up the sushi, starting from the side with the cream cheese filling. Moisten the border with water to seal the roll.
11. Slice the roll into 1-inch pieces and serve.
Notes
Store any leftover red velvet cheesecake sushi rolls in the refrigerator for up to 3 days.
- Prep Time: 15
- Cook Time: 30
- Category: Pies & Pastries
- Method: Baking
- Cuisine: American
Conclusion
These Red Velvet Cheesecake Sushi Rolls are truly a unique and delightful dessert that will impress your family and friends. With their rich, creamy filling, moist red velvet cake, and satisfying crunch from the nori wrap, they’re a perfect balance of flavors and textures. Whether you make them for a special occasion or just because you’re craving something truly indulgent, I promise this recipe will become a new favorite. So why not give it a try today? I can’t wait to hear what you think!


