
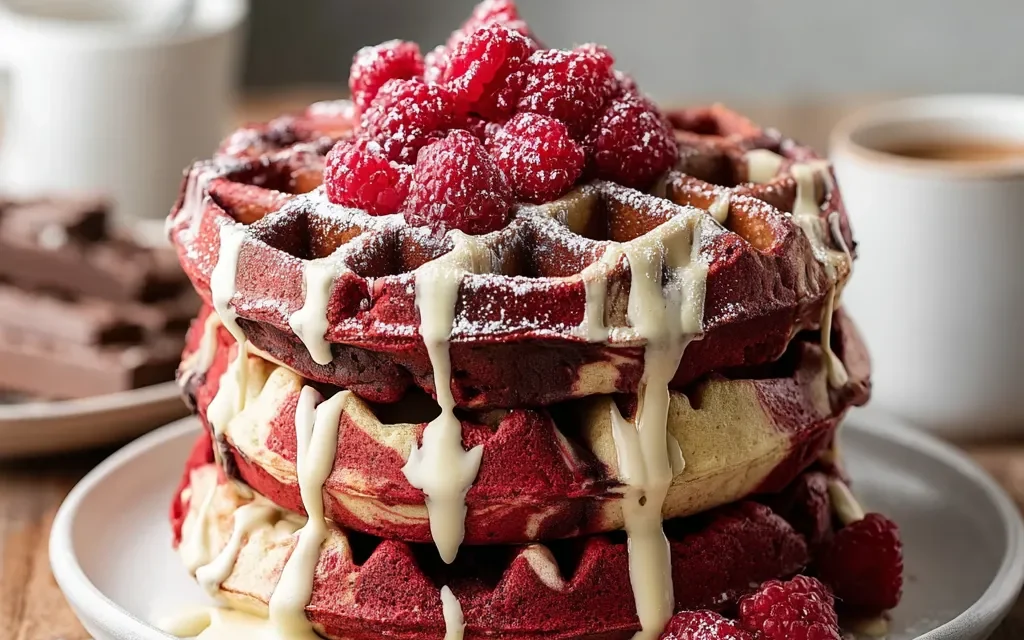
It was a cozy weekend morning, the kind that just begged for a special breakfast. As I pulled out my trusty waffle iron, I couldn’t help but crave something truly indulgent – Red Velvet Marble Waffles. These weren’t your ordinary waffles; they were a delightful fusion of classic red velvet and the beautiful marbled pattern that just screams “weekend brunch!”
I still remember the first time I tried this recipe. The kids had been begging for a fun, colorful breakfast, and I wanted something that would truly impress. When I stumbled upon this Red Velvet Marble Waffles recipe, I knew I had to give it a try. The moment I poured that vibrant red batter onto the hot waffle iron, the aroma of cocoa and vanilla filled the air, and I could hardly contain my excitement.
As the waffles cooked to golden perfection, I watched in awe as the red and dark chocolate batters swirled together, creating a stunning marbled effect. When I finally topped them with a dollop of fresh whipped cream and a drizzle of maple syrup, it was as if I had created a work of art – one that was about to be devoured with pure delight.
Why This Red Velvet Marble Waffles Recipe Will Become Your Go-To
The Secret Behind Perfect Red Velvet Marble Waffles
What sets this Red Velvet Marble Waffles recipe apart is the perfect balance of flavors and textures. The combination of rich, velvety cocoa powder and the bright, vibrant red food coloring creates a stunning visual appeal that’s sure to impress your guests. But it’s not just about the look – the addition of just the right amount of sugar, baking powder, and baking soda ensures a light and fluffy waffle that’s crisp on the outside and tender on the inside.
Essential Ingredients You’ll Need
- 2 cups all-purpose flour: The foundation of these waffles, providing structure and a nice, chewy texture.
- 1/4 cup unsweetened cocoa powder: Adds that classic red velvet flavor and deep chocolate notes.
- 2 tablespoons granulated sugar: Balances the acidity of the cocoa and enhances the overall sweetness.
- 2 teaspoons baking powder: Helps the waffles rise and achieve that perfect light and airy texture.
- 1/2 teaspoon baking soda: Reacts with the acidic cocoa powder to create a tender, fluffy waffle.
- 1/2 teaspoon salt: Enhances the other flavors and prevents the waffles from tasting flat.
- 1 1/4 cups milk: Provides moisture and richness to the batter.
- 2 large eggs: Adds structure, richness, and helps bind the ingredients together.
- 4 tablespoons unsalted butter, melted: Contributes to the tender, flavorful texture of the waffles.
- 1 teaspoon vanilla extract: Enhances the overall flavor profile and complements the red velvet notes.
- 1-2 tablespoons red food coloring: Gives the waffles their iconic red velvet hue.
Step-by-Step Red Velvet Marble Waffles Instructions
Preparing Your Red Velvet Marble Waffles
With a prep time of just 15 minutes and a cook time of 15 minutes, these Red Velvet Marble Waffles are the perfect weekend brunch treat. All you’ll need is a waffle iron, a mixing bowl, and a whisk to create this delightful dish.
1- In a large mixing bowl, whisk together the all-purpose flour, unsweetened cocoa powder, granulated sugar, baking powder, baking soda, and salt until well combined.
2- In a separate bowl, whisk together the milk, eggs, melted butter, and vanilla extract until smooth. Gradually add the wet ingredients to the dry ingredients, stirring just until combined. Be careful not to overmix.
3- Divide the batter in half and add 1-2 tablespoons of red food coloring to one half, mixing until the color is evenly distributed.
4- Preheat your waffle iron and lightly grease it with nonstick cooking spray. Scoop alternating spoonfuls of the red and plain batters onto the hot waffle iron, creating a marbled effect.
5- Cook the waffles for 3-4 minutes, or until they’re golden brown and crispy on the outside.
6- Serve the Red Velvet Marble Waffles hot, with a generous drizzle of maple syrup, a dollop of whipped cream, and a dusting of powdered sugar for the ultimate indulgence.
Pro Tips for Success
- Be sure not to overmix the batter, as this can result in tough, rubbery waffles. Gently fold the wet and dry ingredients together until just combined.
- Use high-quality unsweetened cocoa powder for the richest, most intense chocolate flavor.
- Experiment with the amount of red food coloring to achieve your desired shade of red velvet. Start with 1 tablespoon and add more as needed.
- Preheat your waffle iron thoroughly before adding the batter to ensure crisp, evenly cooked waffles.
Serving and Storing Your Red Velvet Marble Waffles
Perfect Pairings for Red Velvet Marble Waffles
These Red Velvet Marble Waffles are the perfect centerpiece for a decadent brunch, serving up to 6 people. For a truly indulgent experience, pair them with a fresh fruit salad, crispy bacon or sausage, and a steaming mug of hot coffee or rich hot chocolate. The contrast of the sweet, chocolatey waffles with the tartness of fresh berries and the saltiness of the meat is simply divine.
Storage and Make-Ahead Tips
If you have any leftover Red Velvet Marble Waffles, they can be stored in an airtight container in the refrigerator for up to 3 days. To reheat, simply pop them in the toaster or oven until warmed through.
For make-ahead convenience, you can also freeze the waffles for up to 2 months. To do so, allow the waffles to cool completely, then place them in a single layer on a baking sheet and freeze until solid. Transfer the frozen waffles to an airtight container or resealable plastic bag. When ready to enjoy, simply reheat them in the toaster or oven until heated through.
Variations and Dietary Adaptations for Red Velvet Marble Waffles
Creative Red Velvet Marble Waffles Variations
- Swap out the vanilla extract for a hint of almond extract for a delightful twist.
- Fold in chopped pecans or walnuts for a crunchy texture.
- Top the waffles with a cream cheese-based frosting for an extra-indulgent treat.
- Try adding a swirl of raspberry or chocolate sauce for a delicious flavor contrast.
Making Red Velvet Marble Waffles Diet-Friendly
For a gluten-free version, simply substitute the all-purpose flour with a gluten-free flour blend. Adjust the amount of liquid as needed to achieve the desired batter consistency.
To make these waffles vegan, replace the eggs with flax or chia eggs (1 tablespoon ground flax or chia seeds mixed with 3 tablespoons water), use non-dairy milk, and swap the butter for a plant-based alternative, like coconut oil or vegan margarine.
For a lower-carb option, you can try using a combination of almond flour and coconut flour in place of the all-purpose flour. Just be sure to adjust the liquid and leavening agents accordingly.
Frequently Asked Questions
Q: Can I substitute the all-purpose flour with whole wheat flour?
A: While you can use whole wheat flour, it will result in a denser, heartier texture. The waffles may also have a slightly nutty flavor.
Q: How long do the waffles take to cook?
A: The total time for this recipe is 30 minutes, with a 15-minute prep time and a 15-minute cook time.
Q: Can I make the batter ahead of time?
A: Yes, you can make the batter up to 2 days in advance and store it covered in the refrigerator. Just be sure to give it a good stir before using, as the ingredients may separate.
Q: How many servings does this recipe make?
A: This Red Velvet Marble Waffles recipe yields 6 servings.
Q: My waffles are turning out dry or tough. What am I doing wrong?
A: Overmixing the batter or overcooking the waffles can lead to a dry, tough texture. Be sure to mix the ingredients just until combined, and keep a close eye on the waffles while they’re cooking.

Red Velvet Marble Waffles
- Total Time: 30
- Yield: 6 servings
Description
Indulge in the luxurious flavors of these homemade Red Velvet Marble Waffles, perfectly fluffy and swirled with a rich cocoa taste. Serve warm with a drizzle of sweet icing and your favorite toppings for an irresistible breakfast or brunch.
Ingredients
– 2 cups all-purpose flour
– 1/4 cup unsweetened cocoa powder
– 2 tablespoons granulated sugar
– 2 teaspoons baking powder
– 1/2 teaspoon baking soda
– 1/2 teaspoon salt
– 1 1/4 cups milk
– 2 large eggs
– 4 tablespoons unsalted butter, melted
– 1 teaspoon vanilla extract
– 1-2 tablespoons red food coloring
Instructions
1. In a large bowl, whisk together the flour, cocoa powder, sugar, baking powder, baking soda, and salt.
2. In a separate bowl, whisk together the milk, eggs, melted butter, and vanilla.
3. Pour the wet ingredients into the dry ingredients and whisk until just combined (do not overmix).
4. Divide the batter evenly into two bowls. Add the red food coloring to one bowl and mix until well combined, creating the ‘red velvet’ portion.
5. Preheat a waffle iron and lightly grease if necessary. Scoop batter onto the hot waffle iron, alternating spoonfuls of the red velvet and plain batter to create a marble effect.
6. Cook for 4-5 minutes, or until the waffles are golden brown and crispy.
7. Serve the red velvet marble waffles warm, with a drizzle of icing, powdered sugar, and your favorite toppings.
Notes
For a richer flavor, substitute buttermilk for the regular milk. The red velvet batter can also be used to make pancakes instead of waffles.
- Prep Time: 15
- Cook Time: 15
- Category: Cakes & No-Bake Sweets
- Method: Waffle Iron
- Cuisine: American
Conclusion
These Red Velvet Marble Waffles are truly a special treat that will impress your family and friends. The perfect balance of rich cocoa, vibrant red color, and light, fluffy texture makes them an absolute delight. Whether you’re serving them for a leisurely weekend brunch or a special occasion, this recipe is sure to become a new favorite. So why not give it a try? I promise, once you taste these marvelous waffles, you’ll be hooked!


