
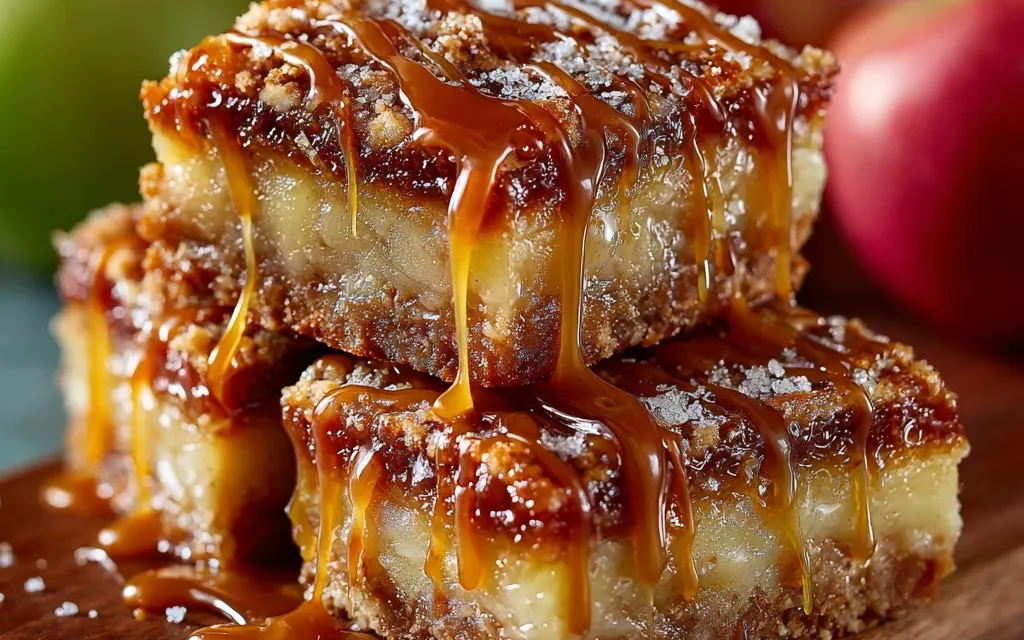
Baking warm, gooey Salted Caramel Apple Bars is one of my fondest memories from growing up. Every fall, my grandma would invite the whole family over to her cozy farmhouse, and the aroma of these irresistible bars would fill the air, drawing us all to the kitchen. As soon as I’d step through the door, I’d catch a glimpse of the golden, buttery crust and the caramelized apple slices peeking through – it was pure heaven. I can still remember the satisfying crunch as I’d take that first bite, the sweet-and-salty caramel melting on my tongue. Grandma’s Salted Caramel Apple Bars were the star of every family gathering, and they’ve remained a cherished tradition that I’m excited to share with you today.
Why This Salted Caramel Apple Bars Recipe Will Become Your Go-To
The Secret Behind Perfect Salted Caramel Apple Bars
This Salted Caramel Apple Bars recipe is truly special because it strikes the perfect balance between buttery, flaky crust, gooey caramel, and tender, cinnamon-spiced apples. The secret lies in the unique technique of par-baking the crust before adding the filling – this ensures a crisp, sturdy base that can support the generous layers without getting soggy. Plus, the caramel is made from scratch, infusing every bite with rich, complex flavor that takes these bars to the next level. Trust me, once you try this recipe, it’ll become your go-to for autumn gatherings and cozy weekends at home.
Essential Ingredients You’ll Need
To make these Salted Caramel Apple Bars, you’ll need a few key ingredients:
- All-purpose flour – The foundation for the buttery, flaky crust
- Unsalted butter – Provides rich flavor and a tender texture
- Brown sugar – Contributes sweetness and a hint of molasses
- Eggs – Helps bind the crust and gives it structure
- Apples – I prefer a mix of tart Granny Smith and sweet Honeycrisp for the perfect balance
- Heavy cream – The base for the silky, indulgent salted caramel
- Salt – Enhances the flavors and balances the sweetness
Step-by-Step Salted Caramel Apple Bars Instructions
Preparing Your Salted Caramel Apple Bars
These Salted Caramel Apple Bars are surprisingly simple to make, but they do require a bit of time and attention to achieve that signature bakery-quality result. You’ll need about an hour and a half from start to finish, and a few basic tools like a 9×13 baking pan, a mixing bowl, and a saucepan. Let’s dive in!
1- Begin by preheating your oven to 375°F and lightly greasing a 9×13 inch baking pan. In a large mixing bowl, combine the flour, brown sugar, and a pinch of salt. Cut in the cold butter until the mixture resembles coarse crumbs.
2- Press half of the crust mixture into the prepared pan, creating an even layer. Bake for 15 minutes to par-bake the crust, then remove it from the oven and let it cool slightly.
3- While the crust is baking, peel, core, and slice the apples into 1/4-inch thick pieces. Arrange the apple slices in a single layer over the partially baked crust.
4- In a medium saucepan, combine the heavy cream, brown sugar, and a pinch of salt. Cook over medium heat, stirring frequently, until the mixture comes to a gentle boil and the sugar has dissolved, about 5-7 minutes.
5- Carefully pour the hot caramel over the apples, making sure to cover them evenly. Sprinkle the remaining crust mixture over the top.
6- Bake the Salted Caramel Apple Bars for 30-35 minutes, until the top is golden brown and the caramel is bubbly. Allow the bars to cool completely before cutting into squares and serving.
Pro Tips for Success
To ensure your Salted Caramel Apple Bars turn out perfectly every time, here are a few pro tips:
- Use a mix of tart and sweet apples for the best flavor balance
- Be sure to par-bake the crust before adding the filling to prevent a soggy bottom
- Keep a close eye on the caramel to prevent it from burning
- Let the bars cool completely before cutting for clean, neat slices
- Sprinkle a pinch of flaky sea salt over the top for that signature salted caramel flavor
Serving and Storing Your Salted Caramel Apple Bars
Perfect Pairings for Salted Caramel Apple Bars
These Salted Caramel Apple Bars are the ultimate autumn treat, and they pair beautifully with a steaming mug of apple cider or a scoop of vanilla ice cream. They also make a lovely addition to any Thanksgiving or holiday dessert spread. For a cozy weekend at home, I love serving them with a cup of hot coffee or a glass of red wine.
Storage and Make-Ahead Tips
Salted Caramel Apple Bars are the perfect make-ahead dessert. Once the bars have cooled completely, you can store them in an airtight container at room temperature for up to 4 days. They also freeze exceptionally well – simply wrap the entire pan in foil or plastic wrap and freeze for up to 3 months. When ready to serve, thaw the bars at room temperature and enjoy!
Variations and Dietary Adaptations for Salted Caramel Apple Bars
Creative Salted Caramel Apple Bars Variations
While the classic Salted Caramel Apple Bars are hard to beat, there are plenty of fun ways to put your own spin on this recipe. Try swapping the apples for pears or a mix of different fall fruits, or add a sprinkle of chopped nuts like pecans or walnuts for extra crunch. You could also experiment with different spices, like ginger or cardamom, to complement the caramel and apple flavors.
Making Salted Caramel Apple Bars Diet-Friendly
For a gluten-free version of these Salted Caramel Apple Bars, simply swap the all-purpose flour for a 1-to-1 gluten-free flour blend. To make them dairy-free, replace the butter with vegan butter or coconut oil, and use full-fat coconut milk or oat milk in place of the heavy cream. If you’re watching your carbs, you can reduce the amount of brown sugar in both the crust and the caramel.
Frequently Asked Questions
Q: Can I use a different type of apple?
A: Absolutely! While I recommend a mix of tart and sweet apples, you can use any variety you like. Just be sure to adjust the baking time if the apples are particularly soft or juicy.
Q: How can I ensure the crust doesn’t get soggy?
A: The key is to par-bake the crust before adding the filling. This helps create a sturdy base that can support the caramel and apples without getting soggy.
Q: Can I make the Salted Caramel Apple Bars ahead of time?
A: Yes, these bars freeze beautifully! Simply wrap the cooled, baked bars in foil or plastic wrap and freeze for up to 3 months. Thaw at room temperature before serving.
Q: How many people does this recipe serve?
A: This 9×13 inch pan of Salted Caramel Apple Bars will yield 12-16 servings, depending on how you cut them.
Q: What if the caramel is too thick or thin?
A: If the caramel is too thick, you can thin it out by stirring in a tablespoon or two of heavy cream. If it’s too thin, let it simmer for a bit longer to evaporate some of the excess moisture.

Salted Caramel Apple Bars
- Total Time: 45
- Yield: 12
Description
Indulge in the ultimate autumn treat with these irresistible Salted Caramel Apple Bars. Layers of flaky crust, tart apples, and gooey salted caramel come together in this comforting dessert.
Ingredients
– 2 cups all-purpose flour
– 1 cup granulated sugar
– 1 cup unsalted butter, softened
– 1 teaspoon baking powder
– 1/2 teaspoon salt
– 4 cups peeled and sliced Granny Smith apples
– 1 cup packed brown sugar
– 1 tablespoon ground cinnamon
– 1/2 cup salted caramel sauce
Instructions
1. – Preheat oven to 350°F. Grease a 9×13-inch baking pan.
2. – In a large bowl, combine the flour, granulated sugar, butter, baking powder, and salt. Mix until a crumbly dough forms.
3. – Press half of the dough into the prepared baking pan, creating an even layer.
4. – In a separate bowl, toss the apple slices with the brown sugar and cinnamon.
5. – Arrange the apple mixture over the crust in the pan.
6. – Drizzle the salted caramel sauce evenly over the apples.
7. – Crumble the remaining dough over the top of the caramel and apples.
8. – Bake for 30-35 minutes, or until the top is golden brown and the apples are tender.
9. – Allow to cool completely before cutting into bars.
Notes
For a crunchy topping, you can sprinkle chopped pecans or walnuts over the crumbled dough before baking. The bars can be stored in an airtight container at room temperature for up to 5 days.
- Prep Time: 15
- Cook Time: 30
- Category: Dessert
- Method: Baking
- Cuisine: American
Conclusion
There’s nothing quite like the irresistible combination of buttery crust, gooey caramel, and tender, spiced apples in a batch of homemade Salted Caramel Apple Bars. This recipe is a true crowd-pleaser that’s sure to become a fall baking staple in your household. Whether you’re hosting a cozy gathering or simply treating yourself to a comforting dessert, these bars are guaranteed to delight. So preheat your oven, gather your ingredients, and get ready to create a new cherished memory around the flavors of this classic recipe. Enjoy!


