
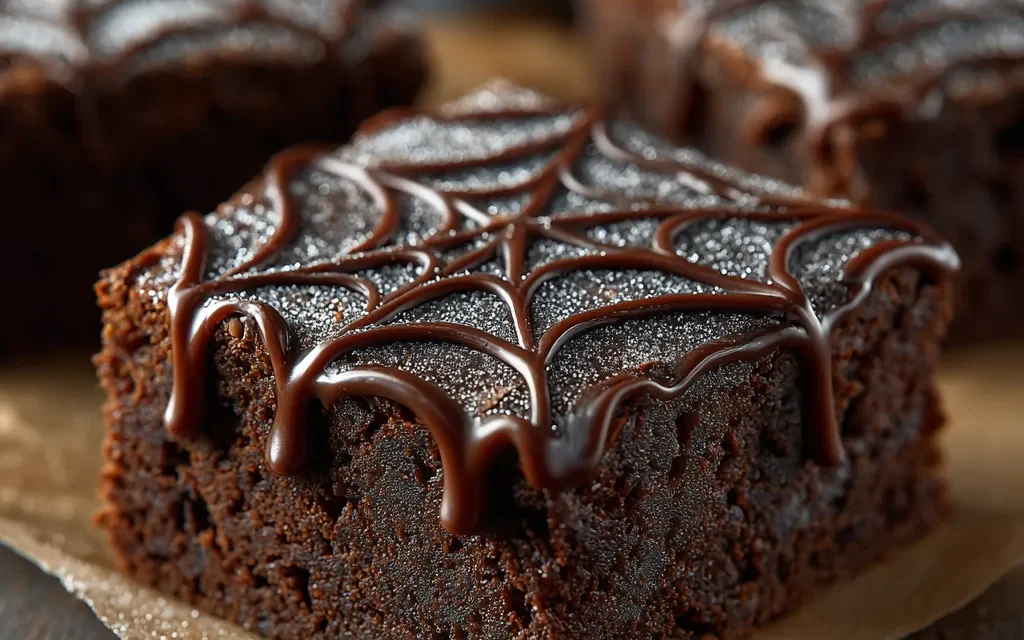
Spiderweb Brownies have always been my go-to Halloween treat. There’s just something so fun and festive about those swirling spider web designs on top of a rich, fudgy brownie. I can still remember the first time I made them for a big Halloween party back in college. I was so nervous, worried they wouldn’t turn out right, but the minute I pulled that tray of Spiderweb Brownies out of the oven, the whole room lit up. Everyone oohed and aahed, and within minutes, the whole batch was gone! From that moment on, I knew this Spiderweb Brownies recipe would become a beloved tradition.
Why This Spiderweb Brownies Recipe Will Become Your Go-To
The Secret Behind Perfect Spiderweb Brownies
What makes this Spiderweb Brownies recipe so special is the unique technique I use to create those intricate spider web designs on top. Rather than just swirling the batter, I’ve developed a foolproof method that gives you perfect, defined spider web patterns every single time. The key is all in how you pour and swirl the white chocolate topping – it takes a little bit of practice, but once you get the hang of it, you’ll be whipping up Instagram-worthy Spiderweb Brownies like a pro.
Essential Ingredients You’ll Need
- Unsweetened chocolate – This is the base for your rich, fudgy brownie batter.
- Butter – Adds incredible moisture and decadence.
- Granulated sugar – Sweetens the brownies and balances the chocolate.
- Eggs – Binds the batter together and gives the brownies their signature texture.
- All-purpose flour – Just a small amount to provide structure.
- White chocolate chips – These get melted down to create the spider web topping.
- Food coloring (optional) – For an extra Halloween touch, you can tint the white chocolate topping with orange or black food coloring.
Step-by-Step Spiderweb Brownies Instructions
Preparing Your Spiderweb Brownies
These Spiderweb Brownies are surprisingly easy to make, with just a few simple steps. The total time from start to finish is about an hour, and the only equipment you’ll need is a mixing bowl, a baking pan, and a spoon or spatula. Let’s get started!
1- Preheat your oven to 350°F and grease an 8×8-inch baking pan. In a medium saucepan, melt the unsweetened chocolate and butter together over low heat, stirring constantly until smooth and glossy.
2- Remove the chocolate-butter mixture from the heat and let it cool for 5 minutes. Then, whisk in the granulated sugar until well combined.
3- One at a time, crack the eggs into the batter and whisk vigorously after each addition. This helps create that signature fudgy texture.
4- Finally, gently fold in the all-purpose flour just until it’s incorporated – be careful not to overmix.
5- Pour the brownie batter into your prepared baking pan and use a spatula to spread it out into an even layer.
6- Bake the Spiderweb Brownies for 25-30 minutes, until a toothpick inserted in the center comes out mostly clean. Allow the brownies to cool completely in the pan before topping.
Pro Tips for Success
The key to perfect Spiderweb Brownies is all in the spider web design on top. To get those crisp, defined lines, you’ll want to work quickly and with confidence. Don’t be afraid to play around and experiment until you find the technique that works best for you. And remember, even if your first attempt isn’t Instagram-worthy, they’ll still taste delicious!
Serving and Storing Your Spiderweb Brownies
Perfect Pairings for Spiderweb Brownies
These Spiderweb Brownies are the ultimate Halloween treat, but they also work wonderfully for any fall or autumnal celebration. They pair beautifully with a scoop of vanilla ice cream or a dollop of freshly whipped cream. For a grown-up twist, try serving them with a glass of rich, bold red wine or a pumpkin spice latte.
Storage and Make-Ahead Tips
Luckily, Spiderweb Brownies keep really well. Once the brownies have cooled completely and the spider web topping has set, you can store them in an airtight container at room temperature for up to 5 days. For longer storage, they’ll stay fresh in the fridge for up to 1 week. To reheat, just pop them in the microwave for 15-20 seconds. You can even make the brownie base in advance and freeze it for up to 3 months – just thaw and top with the spider web design when you’re ready to serve.
Variations and Dietary Adaptations for Spiderweb Brownies
Creative Spiderweb Brownies Variations
While the classic Spiderweb Brownies are tough to beat, there are lots of fun ways to mix things up. Try adding crushed Oreos or chocolate chips to the batter for extra chocolatey goodness. For a Halloween spin, you could also fold in chopped up candy corn or mini pumpkin-shaped candies. And if you’re feeling really adventurous, you could even try swirling in a layer of pumpkin or cream cheese filling.
Making Spiderweb Brownies Diet-Friendly
Believe it or not, you can absolutely make Spiderweb Brownies that are gluten-free, vegan, or low-carb. Just swap out the all-purpose flour for your favorite gluten-free blend, use dairy-free chocolate and butter alternatives, and opt for a low-carb sweetener instead of regular sugar. The spider web topping can be made with sugar-free white chocolate chips, too. With a few simple swaps, everyone can enjoy these festive Halloween treats.
Frequently Asked Questions
Q: Can I use regular chocolate chips instead of unsweetened chocolate?
A: You can, but I don’t recommend it. Unsweetened chocolate gives the brownies a much richer, more intense chocolate flavor that really shines through. Regular chocolate chips will make the brownies taste a bit sweeter and less fudgy.
Q: How do I get the spider web design so perfect?
A: The key is to work quickly and confidently when swirling the white chocolate topping. Start by pouring the melted white chocolate in a spiral pattern starting from the center of the brownies. Then, use a toothpick or skewer to drag lines from the center out to the edges in a web-like design. The faster you work, the crisper your spider web will turn out.
Q: Can I make the Spiderweb Brownies ahead of time?
A: Absolutely! The brownie base can be made up to 3 days in advance and stored in an airtight container. When you’re ready to serve, just whip up the spider web topping and spread it over the cooled brownies. You can also freeze the untopped brownie base for up to 3 months.
Q: How many Spiderweb Brownies does this recipe make?
A: This recipe will yield 16 generous brownies squares when baked in an 8×8-inch pan. You can certainly cut them into smaller bite-sized pieces if you’d like – just keep in mind that the spider web design may not be as defined on the smaller squares.
Q: What if my spider web design doesn’t turn out perfectly?
A: Don’t worry, even imperfect Spiderweb Brownies will still taste amazing! The beauty of this recipe is that the spider web design is purely for presentation. If your first attempt isn’t Instagram-worthy, just embrace the rustic, homemade look. Your guests will be delighted either way.

Spiderweb Brownies
- Total Time: 35
- Yield: 16
Description
Indulge in the rich, fudgy goodness of these Spiderweb Brownies – a festive Halloween treat that’s irresistibly delicious and easy to make!
Ingredients
– 1 cup unsalted butter, melted
– 2 cups granulated sugar
– 4 large eggs
– 1 cup all-purpose flour
– 3/4 cup unsweetened cocoa powder
– 1/2 teaspoon salt
– 1 cup semisweet chocolate chips
– 1 cup white icing or frosting
Instructions
1. – Preheat oven to 350°F. Grease a 9×13-inch baking pan.
2. – In a large bowl, whisk together the melted butter and sugar until combined.
3. – Beat in the eggs one at a time, then stir in the flour, cocoa powder, and salt until just combined. Fold in the chocolate chips.
4. – Spread the batter evenly into the prepared baking pan.
5. – Bake for 25-30 minutes, until a toothpick inserted in the center comes out clean.
6. – Allow the brownies to cool completely, then use a piping bag to pipe a spiderweb pattern on top with the white icing.
7. – Slice and serve the Spiderweb Brownies for a festive Halloween treat!
Notes
– For an extra spooky touch, sprinkle the brownies with edible glitter or dust them with cocoa powder.
– Store the brownies in an airtight container at room temperature for up to 5 days.
- Prep Time: 10
- Cook Time: 25
- Category: Dessert
- Method: Baking
- Cuisine: American
Conclusion
There’s no doubt about it – these Spiderweb Brownies are going to become an instant classic in your household. With their rich, fudgy texture and that showstopping spider web design on top, they’re sure to impress everyone who tries them. Plus, they’re surprisingly easy to make, with a few simple tricks to get that intricate pattern just right. So what are you waiting for? Whip up a batch of these festive Spiderweb Brownies and get ready to watch them disappear in no time! Don’t forget to let me know how yours turn out in the comments below.


