

Sinking my teeth into a deliciously gooey Sushi Rice Krispie Treat is one of my favorite indulgences. There’s just something so satisfying about that perfect blend of chewy, crunchy, and sweet. It all started a few years ago when I was hosting a big sushi night for my friends. I wanted to put a unique spin on a classic dessert, so I decided to experiment with incorporating sushi rice into some Rice Krispie treats. Let me tell you, the results were nothing short of incredible!
The first time I made these Sushi Rice Krispie Treats, my friends were a bit skeptical. “Sushi rice in a dessert? Are you sure about that?” they questioned. But after just one bite, their doubts quickly melted away. The sushi rice added an unexpected savory note that perfectly balanced the sweetness of the marshmallows and Rice Krispies. It was like a party in your mouth – sweet, salty, chewy, and crunchy all at once. Needless to say, that batch disappeared in record time.
Since then, Sushi Rice Krispie Treats have become a staple in my kitchen. They’re so quick and easy to make, and they always impress a crowd. Whether I’m hosting a potluck, bringing a dish to a BBQ, or just treating myself to an afternoon snack, these Sushi Rice Krispie Treats never disappoint. The best part? The total time from start to finish is just 10 minutes. You can’t beat that for a homemade dessert!
Why This Sushi Rice Krispie Treats Recipe Will Become Your Go-To
The Secret Behind Perfect Sushi Rice Krispie Treats
What makes this Sushi Rice Krispie Treats recipe so special is the perfect balance of flavors and textures. The sushi rice brings a subtle savory note that complements the sweetness of the marshmallows and Rice Krispies. And the combination of chewy, crunchy, and gooey makes every bite utterly irresistible.
The key is in the preparation. By starting with perfectly cooked sushi rice and carefully folding it into the marshmallow-butter mixture, you end up with a treats that hold their shape beautifully. No mushy or crumbly Sushi Rice Krispie Treats here! And the addition of the Rice Krispies cereal provides the perfect amount of crunch to contrast with the soft, pillowy texture.
Essential Ingredients You’ll Need
To make these amazing Sushi Rice Krispie Treats, you’ll need just a handful of simple ingredients:
- 3 cups cooked sushi rice, cooled – This is the star of the show! The sticky, short-grain sushi rice adds a unique savory element that sets these treats apart from traditional Rice Krispie treats.
- 4 cups miniature marshmallows – The marshmallows provide the sweetness and gooey texture that makes these Sushi Rice Krispie Treats so irresistible.
- 3 tablespoons unsalted butter – The butter helps bind the ingredients together and gives the treats a rich, decadent mouthfeel.
- 5 cups Rice Krispies cereal – The crunchy Rice Krispies cereal provides the perfect contrast to the soft sushi rice and marshmallow.
Step-by-Step Sushi Rice Krispie Treats Instructions
Preparing Your Sushi Rice Krispie Treats
With a prep time of just 5 minutes and a cook time of 5 minutes, these Sushi Rice Krispie Treats come together in a flash. All you need is a large microwave-safe bowl, a spatula, and a greased 9×13-inch baking dish.
1- Start by measuring out 3 cups of cooked, cooled sushi rice. Make sure it’s at room temperature before you begin – you don’t want the rice to be piping hot, or it could melt the marshmallows.
2- In the microwave-safe bowl, melt the 3 tablespoons of unsalted butter. Once the butter is melted, add the 4 cups of miniature marshmallows and stir continuously until the marshmallows are completely smooth and creamy.
3- Working quickly, fold the 3 cups of sushi rice into the melted marshmallow mixture. Be gentle but thorough, making sure the rice is evenly distributed.
4- Finally, gently fold in the 5 cups of Rice Krispies cereal. You want to avoid crushing the cereal, so use a light hand. The mixture should be well-coated but still retain that signature crunchy texture.
5- Immediately transfer the Sushi Rice Krispie Treat mixture to the greased baking dish, using your spatula to press it into an even layer.
6- Allow the treats to cool completely before cutting into 16 squares and serving. The finished Sushi Rice Krispie Treats should be gooey, chewy, and perfectly balanced in flavor.
Pro Tips for Success
- For the best texture, make sure your sushi rice is completely cooled before adding it to the marshmallow mixture. Warm rice will melt the marshmallows.
- Don’t overpack the baking dish – spread the mixture out evenly to allow the treats to set properly. Overcrowding can lead to uneven cooking.
- Use a greased spatula or wax paper to press the mixture into the pan – this will prevent it from sticking to your hands.
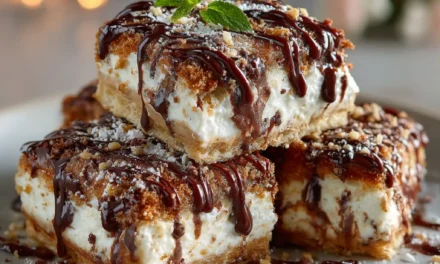
- For a fun presentation, try topping the cooled Sushi Rice Krispie Treats with a drizzle of melted white chocolate or a sprinkle of crushed toasted sesame seeds.
- If you find the treats are a bit too sticky, try lightly greasing your hands before pressing the mixture into the pan.
Serving and Storing Your Sushi Rice Krispie Treats
Perfect Pairings for Sushi Rice Krispie Treats
These Sushi Rice Krispie Treats are the perfect sweet treat to serve at your next sushi night or Asian-inspired gathering. They make a great appetizer or dessert, and pair beautifully with green tea, hot or iced. For a more indulgent pairing, try serving them with a scoop of creamy vanilla ice cream.
Since this recipe yields 16 servings, it’s perfect for sharing with a crowd. Pack them up in cute individual boxes or bags for a thoughtful homemade gift. Or simply arrange them on a platter and watch them disappear in no time!
Storage and Make-Ahead Tips
Luckily, Sushi Rice Krispie Treats are incredibly easy to store and make ahead. Once the treats have cooled completely, you can store them in an airtight container at room temperature for up to 5 days. If you need to keep them fresh for longer, they’ll stay good in the fridge for up to 1 week.
For longer-term storage, you can also freeze the Sushi Rice Krispie Treats. Just wrap them individually in plastic wrap and place them in a freezer-safe bag or container. They’ll stay fresh in the freezer for up to 3 months. When you’re ready to enjoy them, simply thaw the treats at room temperature for 30 minutes before serving.
And the best part? You can easily make a big batch of these treats in advance. The prep and cook time is so quick, it’s a breeze to whip up a double or triple batch to have on hand. Then you’ll always be ready with a delicious homemade dessert!
Variations and Dietary Adaptations for Sushi Rice Krispie Treats
Creative Sushi Rice Krispie Treats Variations
While the classic Sushi Rice Krispie Treats recipe is truly a winner, there are so many ways to put a fun twist on this tasty treat. Try adding a sprinkle of toasted sesame seeds or crushed nori for an extra savory kick. For a pop of color and fruity flavor, fold in some diced mango or pineapple. You could even experiment with different types of rice, like brown or wild rice, for a heartier texture.
Another fun variation is to create layered Sushi Rice Krispie Treats by alternating the rice mixture with a layer of sweetened condensed milk or chocolate hazelnut spread. Get creative with fun shapes, too – use cookie cutters to cut the treats into adorable sushi-inspired shapes.
Making Sushi Rice Krispie Treats Diet-Friendly
Looking to make your Sushi Rice Krispie Treats a bit more figure-friendly? No problem! There are plenty of easy swaps you can make.
For a gluten-free version, simply use gluten-free Rice Krispies cereal. You can also opt for brown rice syrup instead of marshmallows to create a vegan, dairy-free treat. And for a lower-carb take, try using a keto-friendly sweetener like Swerve in place of the marshmallows.
No matter how you choose to adapt the recipe, the key is to have fun and get creative. The beauty of Sushi Rice Krispie Treats is that they’re so versatile – the possibilities are endless!
Frequently Asked Questions
Q: Can I use regular white rice instead of sushi rice?
A: While you can technically use regular white rice, I really recommend sticking with sushi rice for the best texture and flavor. The stickiness of sushi rice is key to getting that perfect chewy, gooey consistency in the final treats.
Q: How long do these Sushi Rice Krispie Treats take to make from start to finish?
A: Start to finish, these Sushi Rice Krispie Treats come together in just 10 minutes! The prep time is 5 minutes and the cook time is 5 minutes, for a total of 10 minutes.
Q: Can I make these Sushi Rice Krispie Treats ahead of time?
A: Absolutely! These treats store beautifully. You can keep them at room temperature in an airtight container for up to 5 days, or in the fridge for up to 1 week. You can also freeze them for up to 3 months.
Q: How many servings does this recipe make?
A: This Sushi Rice Krispie Treats recipe makes 16 servings. It’s the perfect size for sharing with a crowd or enjoying as a sweet snack throughout the week.
Q: What if my Sushi Rice Krispie Treats turn out too sticky or crumbly?
A: If the treats are too sticky, try lightly greasing your hands before pressing the mixture into the pan. And if they’re too crumbly, you may need to add a bit more melted marshmallow to help bind the ingredients together. With a little practice, you’ll nail the perfect texture.

Sushi Rice Krispie Treats
- Total Time: 10
- Yield: 16 servings
Description
Indulge in the delightful fusion of sushi rice and classic Rice Krispie treats with these quick and easy Sushi Rice Krispie Treats. A perfect snack for parties, gatherings, or anytime you need a sweet and satisfying pick-me-up.
Ingredients
– 3 cups cooked sushi rice, cooled
– 4 cups miniature marshmallows
– 3 tablespoons unsalted butter
– 5 cups Rice Krispies cereal
Instructions
1. In a large microwave-safe bowl, melt the butter and marshmallows together, stirring every 30 seconds until completely smooth.
2. Add the cooked sushi rice and stir until well combined.
3. Gently fold in the Rice Krispies cereal, mixing until the rice and cereal are evenly distributed.
4. Press the mixture firmly into a greased 8×8-inch baking pan, using a spatula or your hands to flatten the top.
5. Allow the treats to cool completely before cutting into squares.
Notes
For a fun twist, try adding a sprinkle of toasted sesame seeds or a drizzle of melted chocolate on top. These treats can be stored in an airtight container at room temperature for up to 5 days.
- Prep Time: 5
- Cook Time: 5
- Category: Cookies & Bars
- Method: No-Bake
- Cuisine: Japanese-American Fusion
Conclusion
If you haven’t tried Sushi Rice Krispie Treats yet, what are you waiting for? This unique spin on a classic dessert is sure to wow your friends and family. The combination of savory sushi rice, gooey marshmallows, and crunchy Rice Krispies is truly something special.
What I love most about this recipe is how quick and easy it is to make. In just 10 minutes, you can whip up a batch of these irresistible treats. They’re perfect for last-minute gatherings, bake sales, or just an afternoon pick-me-up. And with so many delicious variations to try, you’ll never get bored.
So what are you waiting for? Gather your ingredients and get ready to experience the magic of Sushi Rice Krispie Treats. I promise, once you try them, they’ll become a permanent fixture in your dessert repertoire. Be sure to let me know how yours turn out in the comments below!


