
You know those days when you just want something easy, comforting, and absolutely delicious? That’s exactly how I felt last week when I stumbled upon this incredible Thai Sloppy Joe Sliders recipe. I’ve always loved the classic sloppy joe, but this Thai-inspired twist takes it to a whole new level of flavor.
I had a busy week ahead, so the fact that it only takes 25 minutes from start to finish was a total game-changer. I whipped up a batch on a Monday night and my family devoured them in no time. The sweet, savory, and slightly tangy sauce paired perfectly with the tender ground beef and crunchy veggie toppings. It was like a flavor explosion in every bite!
What I loved most was how the recipe came together so quickly without compromising on taste. I’m always looking for easy, family-friendly meals that don’t skimp on the good stuff. These Thai Sloppy Joe Sliders definitely fit the bill. The combination of classic comfort food and Thai-inspired ingredients makes this recipe an instant new favorite in our house.
Why This Thai Sloppy Joe Sliders Recipe Will Become Your Go-To
The Secret Behind Perfect Thai Sloppy Joe Sliders
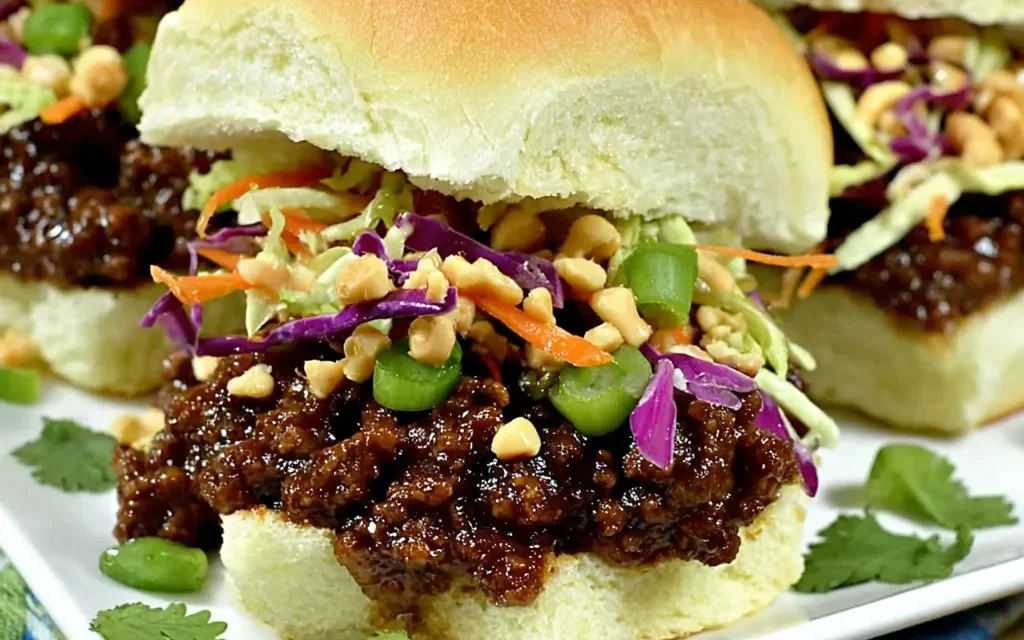
The secret to these incredibly delicious Thai Sloppy Joe Sliders is in the sauce. The combination of soy sauce, rice vinegar, and brown sugar creates a sweet and tangy flavor that perfectly complements the savory ground beef. But it doesn’t stop there – the addition of fresh ginger and garlic takes the taste to the next level.
What really sets this recipe apart is the crunchy veggie topping. Shredded cabbage and carrots add a refreshing crunch that balances out the richness of the beef. And the sliced green onions provide a pop of color and fresh onion flavor. It’s the perfect blend of textures and flavors in every bite.
Essential Ingredients You’ll Need
- 1 pound ground beef: The star of the show! High-quality ground beef is essential for the perfect texture and flavor.
- 1/4 cup soy sauce: This savory, umami-packed ingredient is the backbone of the Thai-inspired sauce.
- 2 tablespoons rice vinegar: The tangy kick from the vinegar helps balance out the sweetness.
- 2 tablespoons brown sugar: Adding a touch of sweetness to the sauce brings everything together.
- 2 cloves garlic, minced: Fresh garlic adds depth and complexity to the flavor profile.
- 1 tablespoon grated ginger: Warm, aromatic ginger takes this recipe to new heights.
- 1/2 head green cabbage, shredded: The crunchy cabbage topping provides the perfect textural contrast.
- 2 carrots, shredded: Shredded carrots add a pop of color and natural sweetness.
- 3 green onions, sliced: Sliced green onions add a fresh, onion flavor and beautiful garnish.
- 12 slider buns: The perfect vessel for these delectable Thai Sloppy Joe Sliders.
Step-by-Step Thai Sloppy Joe Sliders Instructions
Preparing Your Thai Sloppy Joe Sliders
In just 10 minutes of prep time, you’ll have everything ready to go for these amazingly quick and easy Thai Sloppy Joe Sliders. All you’ll need is a large skillet or saucepan and a few simple kitchen tools.
1- Start by heating a large skillet over medium-high heat. Add the ground beef and use a wooden spoon to break it up as it cooks, about 5-7 minutes until browned and cooked through.
2- Drain any excess fat from the pan, then stir in the soy sauce, rice vinegar, brown sugar, minced garlic, and grated ginger. Cook for 2-3 minutes, allowing the flavors to meld together.
3- Next, add the shredded cabbage and carrots to the beef mixture. Cook for another 3-5 minutes, until the veggies have softened slightly but still have a nice crunch.
4- The sauce should thicken up nicely, coating the beef and veggies. You’ll know it’s ready when the mixture has a jammy, saucy consistency.
5- Remove the skillet from the heat and spoon the Thai Sloppy Joe mixture onto the slider buns. Top each one with a sprinkle of sliced green onions.
6- Serve these flavorful Thai Sloppy Joe Sliders immediately while hot and enjoy every bite of this incredible 25-minute meal!
Pro Tips for Success
- Don’t be afraid to adjust the sauce ingredients to your taste. Start with the amounts listed, then add a bit more soy sauce, vinegar, or brown sugar to suit your flavor preferences.
- Make sure to finely grate the ginger using a microplane or small grater. This will ensure the ginger flavor is evenly distributed throughout the dish.
- For extra crunch, you can lightly toast the slider buns before assembling the sliders.
- If you want to get ahead, you can prep the cabbage and carrot slaw topping in advance and store it in the fridge until ready to assemble.
Serving and Storing Your Thai Sloppy Joe Sliders
Perfect Pairings for Thai Sloppy Joe Sliders
These Thai Sloppy Joe Sliders are the ultimate crowd-pleasing meal, making 12 servings that are perfect for a party, game day, or family dinner. To complete the menu, I love serving them with a fresh, crunchy slaw or a side of roasted sweet potato fries. And don’t forget a cold beer or refreshing cocktail to wash it all down!
Storage and Make-Ahead Tips
The great thing about these Thai Sloppy Joe Sliders is that they’re super easy to make ahead of time. You can prepare the beef and veggie mixture up to 3 days in advance and store it in an airtight container in the fridge. When you’re ready to serve, simply reheat the mixture on the stovetop or in the microwave, then assemble the sliders.
If you have leftovers, the sloppy joe filling can be stored in the refrigerator for up to 4 days. For longer-term storage, you can freeze the filling for up to 3 months. Just be sure to thaw it in the fridge overnight before reheating and assembling the sliders.
Variations and Dietary Adaptations for Thai Sloppy Joe Sliders
Creative Thai Sloppy Joe Sliders Variations
If you’re feeling adventurous, there are so many ways to put a unique spin on these Thai Sloppy Joe Sliders:
- Swap in ground turkey or chicken for the beef for a leaner protein option.
- Use a spicy chili crisp or sriracha sauce in place of the soy sauce for an extra kick of heat.
- Top the sliders with fresh herbs like cilantro, basil, or mint for a bright, herbal note.
- Serve the sloppy joe mixture over steamed rice or noodles instead of on buns for a heartier meal.
- Add a sprinkle of toasted sesame seeds or crushed peanuts for a delightful crunch.
Making Thai Sloppy Joe Sliders Diet-Friendly
To make these Thai Sloppy Joe Sliders more diet-friendly, you can easily make a few simple swaps:
- Use a low-sodium soy sauce to cut back on sodium.
- Replace the brown sugar with a calorie-free sweetener like stevia or monk fruit.
- Serve the sloppy joe mixture in lettuce wraps instead of slider buns for a low-carb option.
- Substitute the ground beef with ground turkey or chicken for a leaner protein source.
- Increase the veggie ratio by adding more shredded cabbage and carrots.
No matter how you customize them, these Thai Sloppy Joe Sliders are sure to be a hit with your family and friends!
Frequently Asked Questions
Q: Can I use a different type of ground meat besides beef?
A: Absolutely! Ground turkey or chicken would also work great in this recipe. Just be sure to adjust the cooking time accordingly, as leaner meats may cook faster.
Q: How long does it take to make these Thai Sloppy Joe Sliders?
A: This recipe comes together in just 25 minutes total – 10 minutes of prep time and 15 minutes of cook time. It’s the perfect quick and easy meal for busy weeknights.
Q: Can I make the sloppy joe mixture ahead of time?
A: Yes, the sloppy joe filling can be made up to 3 days in advance and stored in the refrigerator. When you’re ready to serve, simply reheat the mixture and assemble the sliders.
Q: How many servings does this recipe make?
A: This Thai Sloppy Joe Sliders recipe yields 12 servings, perfect for feeding a crowd or enjoying leftovers throughout the week.
Q: What should I do if the sauce is too thin or too thick?
A: If the sauce is too thin, simply continue cooking it for a few more minutes to allow it to thicken up. If it’s too thick, you can thin it out by adding a splash of water or broth. Adjust the seasoning as needed.

Thai Sloppy Joe Sliders
- Total Time: 25
- Yield: 12 servings
Description
Indulge in the irresistible fusion of Thai flavors and sloppy joe goodness with these easy-to-make Thai Sloppy Joe Sliders. Packed with savory ground beef, aromatic seasonings, and fresh toppings, these bite-sized sandwiches are the perfect combination of sweet, sour, and spicy.
Ingredients
– 1 pound ground beef
– 1/4 cup soy sauce
– 2 tablespoons rice vinegar
– 2 tablespoons brown sugar
– 2 cloves garlic, minced
– 1 tablespoon grated ginger
– 1/2 head green cabbage, shredded
– 2 carrots, shredded
– 3 green onions, sliced
– 12 slider buns
Instructions
1. In a large skillet, cook the ground beef over medium-high heat until browned and crumbled, about 5-7 minutes.
2. Drain any excess fat from the skillet, then add the soy sauce, rice vinegar, brown sugar, garlic, and ginger. Stir to combine and let the mixture simmer for 2-3 minutes.
3. Stir in the shredded cabbage, carrots, and green onions, and cook for an additional 2-3 minutes, or until the vegetables are slightly softened.
4. Divide the sloppy joe mixture evenly among the slider buns, topping each with the desired amount of filling.
5. Serve the Thai Sloppy Joe Sliders immediately, garnished with additional green onions or chopped peanuts, if desired.
Notes
These sliders can be made ahead of time and reheated before serving. They also pair well with a side of pickled vegetables or a fresh salad.
- Prep Time: 10
- Cook Time: 15
- Category: Bites & Finger Foods
- Method: Stovetop
- Cuisine: Thai, American
Conclusion
These Thai Sloppy Joe Sliders are an absolute game-changer when it comes to easy, flavorful meals. The blend of sweet, savory, and tangy flavors is simply irresistible, and the crunchy veggie topping adds the perfect textural contrast. Plus, with a total cook time of just 25 minutes, it’s a recipe you’ll find yourself coming back to again and again.
I hope you’ll give this Thai-inspired twist on the classic sloppy joe a try soon. Let me know what you think in the comments – I’d love to hear your feedback! And don’t forget to share this recipe with your friends and family. They’re going to love it just as much as you do.


