
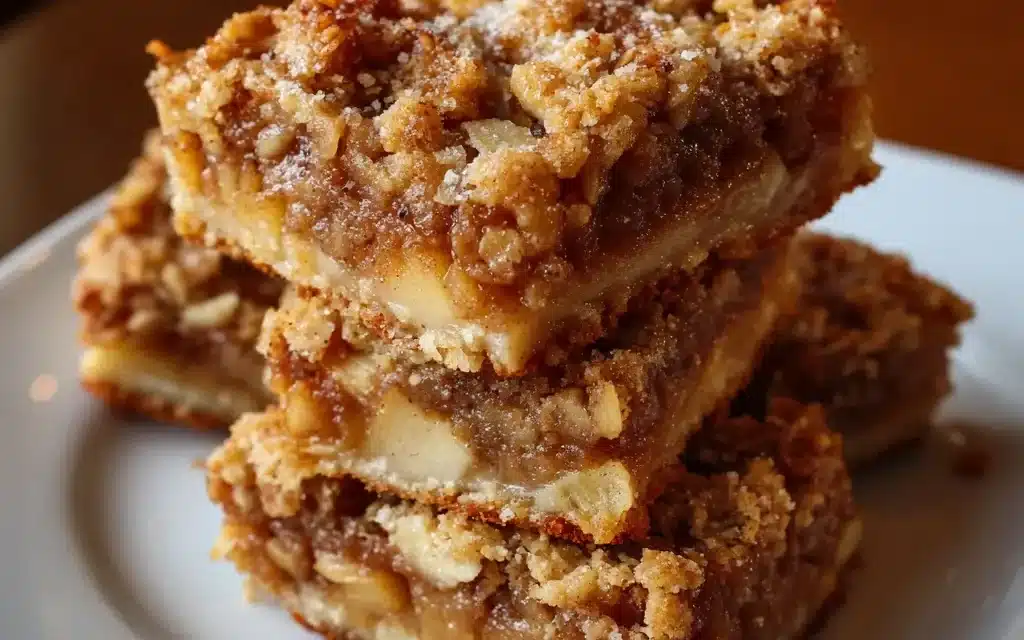
There’s nothing quite like the smell of freshly baked Apple Crisp Bars wafting through the kitchen, is there? It instantly takes me back to my grandma’s cozy little house, where she’d be bustling around the kitchen, humming to herself as she mixed up the perfect blend of juicy apples, crunchy oats, and warm spices. I can practically see her now, carefully layering the ingredients into a baking dish, her eyes sparkling with pride. And oh, the way those bars would come out of the oven, their golden-brown topping glistening and the aroma just enveloping the whole room – it was like a little slice of heaven on earth.
Why This Apple Crisp Bars Recipe Will Become Your Go-To
You see, my grandma’s Apple Crisp Bars weren’t just any ordinary dessert. There was something special about the way she made them, a secret technique that gave them that perfect balance of sweet and tart, soft and crunchy. It’s a recipe that’s been passed down through our family for generations, and now I’m excited to share it with you.
The Secret Behind Perfect Apple Crisp Bars
The key, my grandma always said, was in the way you prepped the apples. She’d take the time to peel, core, and slice them just so, ensuring that every bite was bursting with flavor. And the topping? Well, that was a carefully curated blend of oats, brown sugar, and a touch of cinnamon that would bake up to a irresistible, golden-brown perfection.
Essential Ingredients You’ll Need
To make these Apple Crisp Bars at home, you’ll need:
- Apples – Go for a mix of tart and sweet apples, like Granny Smith and Honeycrisp, for the best flavor.
- Oats – Rolled oats give the topping a lovely texture and crunch.
- Brown sugar – This sweetens the apples and adds depth to the topping.
- Flour – All-purpose flour helps bind the topping together.
- Butter – Unsalted butter is the secret to that buttery, rich flavor.
- Cinnamon – A dash of this warm spice enhances the apple flavor.
- Salt – Just a pinch balances out the sweetness.
Step-by-Step Apple Crisp Bars Instructions
Preparing Your Apple Crisp Bars
Now, let’s get started on this Apple Crisp Bars recipe! It’s really not too complicated, and the end result is well worth the little bit of effort. You’ll need about an hour from start to finish, including baking time. And all you’ll need is a few simple tools – a sharp knife, a mixing bowl, and a baking dish.
1- Start by preheating your oven to 350°F. Grease a 9×13-inch baking dish and set it aside.
2- Peel, core, and slice the apples into 1/2-inch thick pieces. Arrange them in an even layer in the prepared baking dish.
3- In a medium bowl, combine the oats, brown sugar, flour, cinnamon, and salt. Cut in the cold butter until the mixture resembles coarse crumbs.
4- Sprinkle the oat topping evenly over the apples, making sure to cover them completely.
5- Bake the Apple Crisp Bars for 30-35 minutes, until the topping is golden brown and the apples are tender when poked with a fork.
6- Let the bars cool for at least 15 minutes before cutting into squares and serving. Enjoy them on their own or with a scoop of vanilla ice cream on top!
Pro Tips for Success
Now, a few pro tips to ensure your Apple Crisp Bars turn out perfectly every time:
– Use a variety of apples for the best flavor – a mix of tart and sweet works beautifully.
– Don’t skip the step of peeling and slicing the apples. This helps them cook evenly.
– Be sure to cut the butter into the dry ingredients until it resembles coarse crumbs. This creates that irresistible crunchy topping.
– Keep an eye on the bars as they bake – you want the topping to be golden brown, but not too dark.
– Let the bars cool for at least 15 minutes before cutting. This allows the filling to set up nicely.
Serving and Storing Your Apple Crisp Bars
Perfect Pairings for Apple Crisp Bars
These Apple Crisp Bars are the perfect treat for any occasion. They make a great dessert after a cozy autumn meal, but they’re also delicious for brunch or an afternoon snack. Serve them with a scoop of vanilla ice cream or a dollop of whipped cream for an extra special touch. And don’t forget the coffee or tea – the warm spices in the bars pair beautifully with a hot, aromatic beverage.
Storage and Make-Ahead Tips
If you’re lucky enough to have any leftovers, you can store the Apple Crisp Bars at room temperature for up to 3 days. Just be sure to cover them tightly to keep them fresh. You can also freeze the bars for up to 2 months. Simply let them cool completely, then wrap them individually in plastic wrap and pop them in the freezer. When you’re ready to enjoy, just thaw them at room temperature or reheat them in the oven until warmed through.
Variations and Dietary Adaptations for Apple Crisp Bars
Creative Apple Crisp Bars Variations
While my grandma’s classic Apple Crisp Bars are hard to beat, there are lots of ways you can put your own spin on this recipe. Try swapping in different types of fruit, like pears or berries, for a seasonal twist. You can also experiment with adding nuts, like pecans or walnuts, to the topping for extra crunch. And for a fun holiday variation, sprinkle the top with a bit of ground ginger or nutmeg.
### Making Apple Crisp Bars Diet-Friendly
Looking to make your Apple Crisp Bars a little healthier? No problem! You can easily swap out the all-purpose flour for a gluten-free blend or use oat flour instead. And to make them vegan, just use dairy-free butter and skip the ice cream on top. For a lower-carb version, you can use a sugar substitute in place of the brown sugar and omit the oats in the topping.
Frequently Asked Questions
Q: Can I use a different type of apple besides Granny Smith and Honeycrisp?
A: Absolutely! Feel free to use any variety of apples you like. Just keep in mind that tart apples like Granny Smith will balance out the sweetness, while sweeter apples like Fuji or Gala will result in a more dessert-like bar.
Q: How long do I need to bake the Apple Crisp Bars?
A: The bars should bake for 30-35 minutes at 350°F, until the topping is golden brown and the apples are tender. Keep an eye on them towards the end to make sure the topping doesn’t get too dark.
Q: Can I make the Apple Crisp Bars ahead of time?
A: Yes, you can definitely make these bars in advance! They’ll keep at room temperature for up to 3 days, or you can freeze them for up to 2 months. Just be sure to let them cool completely before storing.
Q: How many people does this recipe serve?
A: This 9×13-inch pan of Apple Crisp Bars will serve 12-15 people, depending on how large you cut the squares.
Q: What should I do if the topping gets too dark before the apples are tender?
A: If you notice the topping starting to brown too quickly, simply loosely cover the pan with foil to prevent further browning. This will allow the apples to finish cooking without burning the topping.

Apple Crisp Bars
- Total Time: 45
- Yield: 9
Description
These Apple Crisp Bars are a delightful, comforting dessert that combines a sweet, cinnamon-spiced apple filling with a buttery, crumbly topping. Perfect for any occasion, they’re easy to make and sure to satisfy your sweet tooth.
Ingredients
– 5 cups peeled, sliced apples
– 1 cup all-purpose flour
– 1 cup old-fashioned oats
– 1 cup packed brown sugar
– 1/2 cup unsalted butter, softened
– 1 teaspoon ground cinnamon
– 1/4 teaspoon ground nutmeg
– 1/4 teaspoon salt
Instructions
1. – Preheat the oven to 350°F. Grease an 8×8-inch baking dish.
2. – In a large bowl, toss the sliced apples with the cinnamon and nutmeg until well coated.
3. – In a separate bowl, combine the flour, oats, brown sugar, and salt. Cut in the softened butter until the mixture is crumbly.
4. – Spread the apple mixture in the prepared baking dish. Sprinkle the crumb topping evenly over the apples.
5. – Bake for 30-35 minutes, or until the topping is golden brown and the apples are tender.
6. – Allow the bars to cool for at least 15 minutes before cutting and serving.
Notes
Serve these Apple Crisp Bars warm, with a scoop of vanilla ice cream or a drizzle of caramel sauce for an extra indulgent treat. For a twist, try using a mixture of apples, such as Granny Smith and Honeycrisp, for a variety of flavors and textures.
- Prep Time: 15
- Cook Time: 30
- Category: Dessert
- Method: Baking
- Cuisine: American
Conclusion
There you have it – my grandma’s famous Apple Crisp Bars recipe, straight from her kitchen to yours. I hope these bars bring you the same cozy, comforting feelings they’ve always given me. Go ahead and give this recipe a try – I promise it’ll become a new family favorite. And don’t forget to let me know how they turn out in the comments below!

