
It was a sunny Saturday afternoon, and I was feeling a little nostalgic. You see, when I was a kid, my mom and I would spend hours in the garden, getting our hands dirty and planting all sorts of flowers and veggies. One of my favorite parts was when we’d take a break and snack on something sweet – and that’s where the Potting Soil Pudding Cups came in.
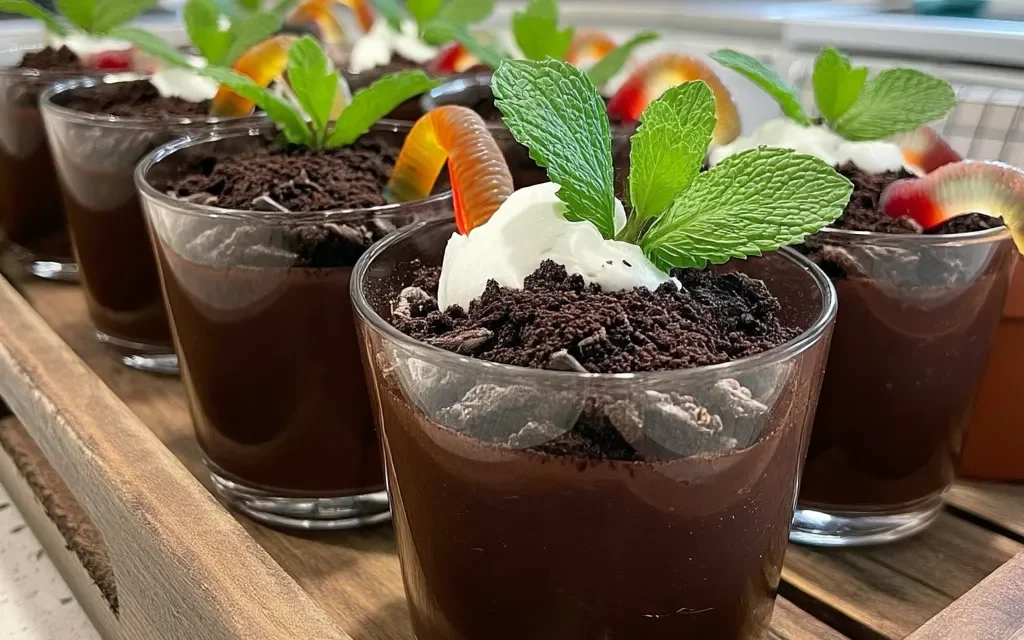
Mom would whip up these delightful little treats, layering chocolate pudding with crushed Oreo cookies to mimic the look of real potting soil. And to top it off, she’d add a few gummy worms for that extra touch of whimsy. It was the perfect balance of creamy, chocolatey goodness and a playful, earthy aesthetic.
As I grew older, those Potting Soil Pudding Cups became a cherished memory, a connection to my childhood and the simple joys of spending time in the garden. And now, I’m thrilled to share this recipe with you, because I just know it’s going to become your new go-to treat.
Why This Potting Soil Pudding Cups Recipe Will Become Your Go-To
The Secret Behind Perfect Potting Soil Pudding Cups
What makes this Potting Soil Pudding Cups recipe so special? It’s all in the attention to detail. See, the key is to create the perfect balance between the rich, creamy chocolate pudding and the crumbly, Oreo cookie “soil.” And when you add those gummy worms on top, it’s like a little edible garden come to life.
The secret is in the technique. By layering the pudding and crushed cookies in a strategic way, you’ll achieve that authentic, layered potting soil look. And the gummy worms? Well, they’re not just for fun – they add a playful texture that takes this dessert to a whole new level.
Essential Ingredients You’ll Need
Now, let’s talk about the all-important ingredients that make this Potting Soil Pudding Cups recipe truly shine:
- 2 cups chocolate pudding: The foundation of this dessert, the chocolate pudding provides the rich, creamy base that perfectly mimics the look and texture of real potting soil.
- 2 cups crushed Oreo cookies: These crumbly cookie crumbs are the key to recreating that authentic potting soil look and feel. The contrast between the pudding and the cookie crumbs is what makes this dessert so visually striking.
- 12 gummy worms: These chewy, wiggly worms are the finishing touch, adding a playful element that brings the whole “edible garden” concept to life. Plus, they’re just plain fun to eat!
Step-by-Step Potting Soil Pudding Cups Instructions
Preparing Your Potting Soil Pudding Cups
Okay, let’s get started on these Potting Soil Pudding Cups! With a prep time of just 15 minutes and a total time of 45 minutes, you can whip these up in no time. All you’ll need are a few simple tools – some small serving cups or jars, a spoon, and a bowl for mixing.
1- Start by preparing the chocolate pudding according to the package instructions. Once it’s nice and creamy, set it aside to cool slightly.
2- Next, it’s time to crush those Oreo cookies. You can do this by placing them in a resealable bag and using a rolling pin to break them down into fine crumbs. Be sure to crush them to a uniform texture for the best “soil” effect.
3- Now, it’s time to assemble the Potting Soil Pudding Cups. Take your serving cups or jars and start by layering a generous amount of the chocolate pudding on the bottom. Sprinkle a layer of the crushed Oreo cookies on top, pressing them down gently to create an even “soil” layer.
4- Continue alternating layers of pudding and cookie crumbs, making sure to get that nice, layered look. You want the final result to resemble a real potting soil mix, with distinct layers of chocolate and “dirt.”
5- For the finishing touch, carefully place the gummy worms on top of the final layer of cookie crumbs, arranging them to look like they’re peeking out of the soil.
6- Pop your Potting Soil Pudding Cups in the fridge for at least 30 minutes to allow the layers to set. When it’s time to serve, simply grab a spoon and enjoy this delightful, edible garden treat!
Pro Tips for Success
Now, let’s talk about a few pro tips to ensure your Potting Soil Pudding Cups turn out perfectly every time:
- Use high-quality chocolate pudding – the better the pudding, the richer and more indulgent the final result will be.
- Make sure to crush the Oreo cookies into a fine, uniform texture. Larger chunks can disrupt the “soil” look.
- Layer the pudding and cookie crumbs carefully, pressing each layer down gently to create distinct, defined layers.
- Chill the assembled cups for at least 30 minutes before serving to allow the flavors to meld and the layers to set.
- Get creative with the gummy worms – try different colors or even mix in some other “edible garden” elements like sprigs of mint or crushed graham crackers.
Serving and Storing Your Potting Soil Pudding Cups
Perfect Pairings for Potting Soil Pudding Cups
These Potting Soil Pudding Cups are the perfect treat for any occasion. They make a great dessert for a family dinner, a fun snack for a garden-themed party, or even a whimsical addition to a child’s birthday celebration. Since this recipe serves 4 servings, it’s the perfect size for a small gathering.
As for pairings, I love serving these Potting Soil Pudding Cups with a refreshing glass of cold milk or a hot cup of coffee. The creamy chocolate pairs beautifully with the dairy, and the crunch of the cookies provides a nice contrast. You could also try a scoop of vanilla ice cream on the side for an extra indulgent twist.
Storage and Make-Ahead Tips
One of the best things about these Potting Soil Pudding Cups is that they’re super easy to store and can even be made in advance.
To store them, simply cover the individual cups tightly with plastic wrap or transfer them to an airtight container. They’ll keep in the refrigerator for up to 3 days. When you’re ready to serve, just give them a quick stir to reincorporate any separated layers.
You can also make the Potting Soil Pudding Cups up to 5 days in advance. Assemble the cups, cover, and refrigerate until you’re ready to serve. Just keep in mind that the cookie crumbs may soften slightly the longer they sit, so you may want to add a few extra crumbs on top right before serving for that perfect “soil” texture.
If you’d like to make a larger batch, you can easily scale up the recipe. Just be sure to divide the mixture evenly among your serving cups or jars. And as for leftovers, the Potting Soil Pudding Cups will keep in the freezer for up to 2 months. Simply thaw in the fridge overnight before serving.
Variations and Dietary Adaptations for Potting Soil Pudding Cups
Creative Potting Soil Pudding Cups Variations
While the classic Potting Soil Pudding Cups are a true delight, there are so many ways to put a unique spin on this recipe.
For a festive twist, try using Oreo cookies with seasonal flavors, like pumpkin or peppermint, for a Halloween or holiday-themed version. You could also experiment with different pudding flavors, like vanilla or butterscotch, for a fun flavor change-up.
Another idea is to add a layer of crushed graham crackers or chopped nuts between the pudding and cookie crumbs for extra texture and crunch. Or, for a more sophisticated take, you could swap the gummy worms for edible flowers or fresh berries.
The possibilities are endless when it comes to customizing these Potting Soil Pudding Cups to suit your tastes and occasions.
Making Potting Soil Pudding Cups Diet-Friendly
Don’t worry, even if you’re following a special diet, you can still enjoy the deliciousness of Potting Soil Pudding Cups. Here are a few easy substitutions to make them diet-friendly:
For a gluten-free version, use gluten-free chocolate sandwich cookies in place of the Oreos. You can also opt for a sugar-free or low-sugar pudding mix to reduce the overall carb and calorie count.
If you’re vegan, swap the chocolate pudding for a dairy-free version, and use vegan Oreo-style cookies. You can even make your own homemade vegan pudding for an extra special touch.
And for a low-carb twist, try using a keto-friendly chocolate pudding mix and crushed pork rind “crumbs” instead of the Oreos. Top it off with sugar-free gummy worms, and you’ve got a guilt-free version of this tasty treat.
Frequently Asked Questions
Q: Can I use a different type of cookie instead of Oreos?
A: Absolutely! While the classic Oreo cookie crumbs are a key part of the Potting Soil Pudding Cups, you can experiment with other cookie varieties. Try using graham crackers, vanilla wafers, or even homemade shortbread cookies for a unique twist.
Q: How long do I need to chill the Potting Soil Pudding Cups before serving?
A: For the best texture and layered appearance, it’s recommended to chill the assembled cups for at least 30 minutes before serving. This allows the pudding to set and the cookie crumbs to hold their shape.
Q: Can I make these Potting Soil Pudding Cups ahead of time?
A: Yes, you can definitely make these in advance! The Potting Soil Pudding Cups will keep in the refrigerator for up to 3 days, or you can assemble them up to 5 days ahead of time and store them covered.
Q: How many servings does this recipe make?
A: This Potting Soil Pudding Cups recipe is designed to serve 4 people. If you need to feed a larger crowd, you can easily scale up the ingredients to make more.
Q: What if my Potting Soil Pudding Cups don’t have the perfect layered look?
A: Don’t worry, even if the layers aren’t perfectly defined, the Potting Soil Pudding Cups will still be delicious. Focus on getting the right texture and flavor balance, and get creative with your presentation. A sprinkle of extra cookie crumbs or a drizzle of chocolate sauce can help hide any imperfections.

Potting Soil Pudding Cups
- Total Time: 45
- Yield: 4 servings
Description
Indulge in the whimsical and delightful Potting Soil Pudding Cups – a playful dessert that combines the rich flavors of chocolate pudding with the crunch of crushed Oreo cookies and the fun of gummy worm ‘plants’. Perfect for parties, kids’ activities, or anytime you need a touch of creativity and charm.
Ingredients
– 2 cups chocolate pudding
– 2 cups crushed Oreo cookies
– 12 gummy worms
Instructions
1. Prepare the chocolate pudding according to the package instructions and let it cool completely.
2. In individual serving cups or small containers, layer the chocolate pudding and crushed Oreo cookies, creating a ‘potting soil’ effect.
3. Gently press the gummy worms into the ‘soil’ to create the appearance of ‘plants’ poking out.
4. Refrigerate the Potting Soil Pudding Cups for at least 30 minutes before serving to allow the layers to set.
5. Enjoy the delicious and whimsical treat!
Notes
For a more vibrant ‘soil’ appearance, consider using a mix of crushed Oreo cookies and crushed graham crackers. You can also experiment with different types of pudding flavors, such as vanilla or butterscotch, to create a unique twist on the recipe.
- Prep Time: 15
- Category: Cookies & Bars
- Method: No-Bake
- Cuisine: American
Conclusion
These Potting Soil Pudding Cups are truly a treat that’ll transport you back to the simple joys of childhood. With their irresistible combination of creamy chocolate pudding, crumbly Oreo “soil,” and playful gummy worms, they’re sure to become a new family favorite.
So why not give this recipe a try? Whip up a batch for your next garden-themed party, a cozy family night in, or just because you’re craving a little bit of nostalgia. I promise, once you take that first delightful bite, you’ll be hooked. Don’t forget to let me know how your Potting Soil Pudding Cups turn out – I’d love to hear your thoughts!


