
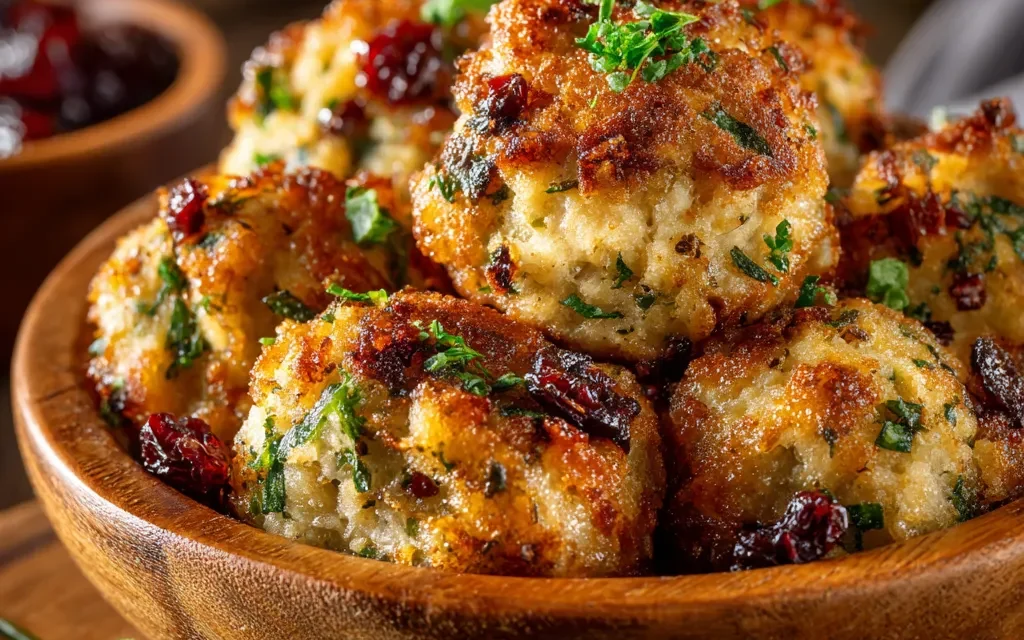
Thanksgiving has always been my favorite holiday, and it’s all because of my grandma’s famous Stuffing Balls Recipe. I can still remember the aroma of those warm, savory bites wafting through the house every year, signaling the start of the most delicious time of the season. As a kid, I’d watch in awe as Grandma skillfully rolled the fluffy bread cubes and seasonings into perfectly round portions, then baked them to golden-brown perfection. It was like magic, and I couldn’t wait to dig in.
These Stuffing Balls Recipe weren’t just a side dish for us – they were the star of the show. We’d fight over the last one on the platter, trying to strategize how to get our hands on an extra helping. And when Thanksgiving dinner was over, Grandma would carefully pack up the leftovers so we could enjoy them for days to come. To this day, that flavor takes me right back to those cherished family gatherings.
Why This Stuffing Balls Recipe Will Become Your Go-To
The Secret Behind Perfect Stuffing Balls Recipe
What made Grandma’s Stuffing Balls Recipe so incredible? It all came down to her secret techniques. First, she always used the freshest, highest-quality bread, carefully cubing it to ensure even cooking. Then, she’d expertly season the mixture with a blend of fragrant herbs, savory spices, and just the right amount of broth to bind it all together. But the real magic happened in the shaping – Grandma would gently roll each portion between her palms, creating perfectly rounded balls that baked up fluffy and irresistible.
Essential Ingredients You’ll Need
To recreate this beloved Stuffing Balls Recipe at home, you’ll need:
- Bread cubes – The foundation of the dish. Look for a sturdy, artisanal loaf that will hold its shape during the shaping and baking process.
- Onion – Finely diced to add aromatic flavor and moisture to the stuffing.
- Celery – Chopped celery brings a nice crunch and subtle sweetness.
- Herbs – A mix of fresh sage, thyme, and parsley lend that classic Thanksgiving aroma.
- Broth – Chicken or vegetable broth helps bind the ingredients and keeps the stuffing moist.
- Eggs – Serve as a binder to hold the Stuffing Balls together.
- Butter – For rich, savory flavor and a tender texture.
- Salt and pepper – To season the stuffing to perfection.
Step-by-Step Stuffing Balls Recipe Instructions
Preparing Your Stuffing Balls Recipe
Making Grandma’s famous Stuffing Balls Recipe is easier than you might think. The whole process takes just about an hour from start to finish, and the results are well worth the effort. You’ll need a large mixing bowl, a baking sheet, and your hands to shape the perfect little stuffing balls.
1- Start by preheating your oven to 375°F and lining a baking sheet with parchment paper.
2- In a large bowl, combine the cubed bread, diced onion, celery, chopped herbs, salt, and pepper. Pour in the broth and beaten eggs, then use your hands to gently mix everything together until fully incorporated.
3- Take a heaping tablespoon of the stuffing mixture and roll it between your palms to form a compact, round ball. Place the Stuffing Ball on the prepared baking sheet, and repeat with the remaining mixture.
4- Once all the Stuffing Balls are shaped, pop the baking sheet into the preheated oven. Bake for 25-30 minutes, or until the exteriors are golden brown and crispy.
5- Remove the Stuffing Balls from the oven and let them cool for a few minutes before serving. Drizzle with melted butter just before placing them on the table.
6- Arrange the warm, fluffy Stuffing Balls on a serving platter and watch them disappear in no time! Pair them with your Thanksgiving turkey, or enjoy them as a standalone appetizer.
Pro Tips for Success
To ensure your Stuffing Balls Recipe turns out perfectly every time, keep these expert tips in mind:
- Use day-old or slightly stale bread for the best texture. Fresh bread can make the stuffing soggy.
- Don’t overmix the ingredients – you want the bread cubes to maintain their shape and integrity.
- Scoop the stuffing mixture with a measuring spoon to get evenly sized balls.
- Bake the Stuffing Balls on the top rack of your oven for maximum crispiness.
- Let the baked Stuffing Balls rest for a few minutes before serving to allow the centers to firm up.
Serving and Storing Your Stuffing Balls Recipe
Perfect Pairings for Stuffing Balls Recipe
These Stuffing Balls Recipe are the ultimate Thanksgiving side dish, but they also make a fantastic appetizer or snack any time of year. Serve them alongside your roasted turkey and mashed potatoes for a classic holiday feast. They also pair beautifully with baked ham, roast chicken, or even as a vegetarian main course.
For beverages, a crisp white wine or a robust red would be delicious companions. Or, for a cozy autumn feel, try pairing the Stuffing Balls with a mug of hot apple cider or mulled wine.
Storage and Make-Ahead Tips
Luckily, Stuffing Balls Recipe are perfect for making ahead of time. You can prepare the stuffing mixture up to 2 days in advance and keep it refrigerated until ready to shape and bake. Or, you can bake the Stuffing Balls in advance and reheat them in the oven just before serving.
Leftover baked Stuffing Balls will keep in an airtight container in the fridge for up to 4 days. To reheat, simply place them on a baking sheet and warm in a 350°F oven for 10-15 minutes until hot and crispy. You can also freeze the baked Stuffing Balls for up to 3 months. Thaw in the refrigerator overnight before reheating.
Variations and Dietary Adaptations for Stuffing Balls Recipe
Creative Stuffing Balls Recipe Variations
While Grandma’s classic Stuffing Balls Recipe is a tried-and-true favorite, there are so many ways to put your own spin on this versatile dish. Try swapping in different bread varieties, like sourdough or cornbread, for unique flavors. You can also get creative with the herbs and spices, adding things like rosary, fennel, or even a hint of cranberry.
For a heartier version, fold in sautéed mushrooms, crumbled sausage, or toasted pecans. Or, make it vegetarian-friendly by using vegetable broth and omitting the meat. The possibilities are endless!
Making Stuffing Balls Recipe Diet-Friendly
Stuffing Balls Recipe can easily be adapted to suit a variety of dietary needs. For a gluten-free version, simply use gluten-free bread cubes instead of traditional bread. To make them vegan, swap the eggs for a flax or chia “egg” and use plant-based butter or olive oil.
For a low-carb or keto-friendly take, try using riced cauliflower or almond flour in place of the bread. And if you’re watching your sodium intake, be mindful of the broth and seasonings you use, opting for low-sodium or no-salt-added varieties.
Frequently Asked Questions
Q: Can I use pre-made stuffing mix instead of cubing my own bread?
A: While pre-made stuffing mix can work in a pinch, I highly recommend using fresh, high-quality bread cubes for the best texture and flavor in your Stuffing Balls Recipe. The homemade version is well worth the extra effort.
Q: How long do the Stuffing Balls need to bake?
A: The Stuffing Balls should bake for 25-30 minutes at 375°F, or until they’re golden brown and crispy on the outside. Keep an eye on them and adjust the time as needed, depending on your oven.
Q: Can I make the Stuffing Balls ahead of time?
A: Absolutely! You can prepare the stuffing mixture up to 2 days in advance and refrigerate it until ready to shape and bake. You can also bake the Stuffing Balls ahead of time and reheat them before serving.
Q: How many Stuffing Balls does this recipe make?
A: This recipe will yield approximately 20-24 Stuffing Balls, depending on the size you shape them. It’s a great recipe to serve a crowd, with plenty of leftovers to enjoy.
Q: What if my Stuffing Balls fall apart during baking?
A: If your Stuffing Balls start to fall apart in the oven, it’s likely because the mixture was too dry or you overmixed the ingredients. Next time, be sure to add a bit more broth to the stuffing and handle it gently when shaping the balls.

Stuffing Balls Recipe
- Total Time: 40
- Yield: 24 stuffing balls
Description
These homemade Stuffing Balls are the perfect comfort food side dish. Packed with savory flavors and a light, fluffy texture, they’re sure to be a hit at your next meal.
Ingredients
– 6 cups cubed bread (day-old or stale works best)
– 1/2 cup unsalted butter
– 1 onion, diced
– 2 celery stalks, diced
– 2 cloves garlic, minced
– 1 tablespoon chopped fresh parsley
– 1 teaspoon dried sage
– 1 teaspoon dried thyme
– 1/2 teaspoon salt
– 1/4 teaspoon black pepper
– 1 cup chicken or vegetable broth
Instructions
1. – Preheat your oven to 375°F (190°C).
2. – In a large skillet, melt the butter over medium heat. Add the onions and celery, and sauté for 5-7 minutes until softened.
3. – Stir in the garlic and cook for an additional minute until fragrant.
4. – Transfer the vegetable mixture to a large bowl. Add the bread cubes, parsley, sage, thyme, salt, and pepper. Toss to combine.
5. – Gradually add the broth, mixing gently until the bread is evenly moistened.
6. – Scoop the stuffing mixture and form into 1-inch balls, placing them on a greased baking sheet.
7. – Bake for 20-25 minutes, or until the stuffing balls are golden brown and crispy on the outside.
8. – Serve hot and enjoy!
Notes
For a richer flavor, you can use a combination of butter and olive oil. You can also add diced apple, cranberries, or chopped nuts to the stuffing for extra texture and sweetness.
- Prep Time: 15
- Cook Time: 25
- Category: Side Dish
- Method: Baking
- Cuisine: American
Conclusion
There’s no doubt about it – this Stuffing Balls Recipe is an absolute must-have in my family’s Thanksgiving lineup. The aroma, the texture, the flavors… it all comes together in the most delightful way. I hope this recipe will become a new tradition in your home, too. Give it a try this holiday season, and don’t forget to let me know how it turns out!


